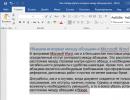
Windows 7 ultimate startup recovery. What to do if the system does not start? Restoring performance in a busy seven
Quite often, personal computer users encounter problems loading Windows. When starting a computer running the Windows 7 operating system, the following message appears on a black screen:
This problem is related to MBR boot record, which is located on your hard drive. At startup the system can't find MBR boot record, which is why this message is displayed. You may ask, where could this boot record have gone? There are several possible answers to this question. The most likely of them is virus attack, in which your bootloader crashed, or was even completely erased. The second reason could be system failure. For example, the power supply was turned off while the computer was running. In this case, files stored on the HDD or SDD, which are responsible for loading the operating system, may be damaged.
Restoring the Windows 7 bootloader using an installation disk or flash drive
At the very beginning, we will need a DVD with a licensed version of Windows 7. This disc contains all the necessary tools that will help us restore the Windows 7 boot loader. What to do if your PC does not have an optical disc reader. In this case, a bootable flash drive with Windows 7 will help you. Microsoft has released a proprietary program “ Windows USB/DVD Download Tool", with which you can create an installation flash drive. To create a bootable USB flash drive, you will need an ISO image of a licensed Windows 7 and a 4 GB flash drive.

If you have prepared a bootable USB flash drive or installation disk, you can begin restoring the bootloader. In our version, the bootable media is a flash drive. The computer used for bootloader recovery includes an MSI A55M-E33 motherboard that has UEFI BIOS support. To boot from a flash drive, you must press the F11 key when the system starts. After pressing the key, the boot menu will open, in which you need to select a bootable USB flash drive. You can do the same if you are booting from a DVD drive.

After booting from the flash drive, after a while the initial installation window will appear.


In this window we should select the item “ System Restore", after which we will be taken to the "" menu.

Next, we’ll use the simplest system recovery option and select “ Startup recovery" After that, troubleshooting and restoration of the Windows 7 bootloader will begin. If the boot record is successfully restored, you will see the bootloader window, which will contain your restored OS, as in the figure below.

By pressing the Enter button, the OS will boot as before.
The method described above does not always work. For those who were unable to restore the bootloader using the method described above, you should use the command line. To do this, in the menu “ System Recovery Options» select the item « Command line».

Now you should run this command: bootrec /fixmbr at the command prompt.

After executing this command, it will happen rewriting the MBR boot sector. But There are times when malware can completely overwrite the bootloader and the rewrite command will not help. If this is your case, then use the bootrec /fixboot command on the command line, which will register a new bootloader on your system.

To see all the commands you can do with the bootloader, you should type bootrec at the command line.

As you can see, if the MBR record has been lost, then restoring the Windows 7 bootloader is a fairly simple task that most PC users can handle.
Preventing MBR boot record from being overwritten
Having successfully restored your bootloader, the next step is to ensure its safety so that overwriting situations do not arise again.
Most often, the main culprit for erasing bootloader files is viruses and various malware. Therefore, you should install antivirus software.
The best comprehensive antivirus products are the following antiviruses:
- Bitdefender Internet Security;
- Kaspersky Internet Security;
- ESET Smart Security;
- AVG Internet Security;
- Outpost Security Suite Pro.
Comprehensive antivirus products, thanks to their modular structure, are superior to conventional antivirus. Judge for yourself, by installing a comprehensive anti-virus package, you will receive:
- Antivirus;
- Firewall;
- Proactive defense.
The main purpose of an antivirus is to search for and neutralize malware. At that time Firewall and projective protection have the main task of protecting against network intrusions and new types of threats. That is, simply put, a firewall and proactive protection prevent malware from getting onto your computer.
We've sorted out anti-virus protection, now let's deal with preventing file corruption bootloader during a sudden power outage. To prevent the computer from turning off during a power outage, it must be connected to uninterruptible power supply. All uninterruptible power supplies have a battery that keeps the computer running after a power outage. The highest quality uninterruptible power supplies are models from the following companies:
- LogicPower;
- Powercom;
- PrologiX.
By choosing high-quality uninterruptible power supplies, you will protect the Windows 7 boot loader from overwriting, and also extend the life cycle of HDD and SDD drives.
In conclusion, I would like to say that if your PC has a high-quality new hard drive installed, a good antivirus, and the computer is powered through a high-quality UPS, then you will not have a problem with the bootloader.
Video on the topic
Hello friends! I have already written many articles about what to do if Windows 7 does not boot. But I haven’t written yet about what you need to do first if your computer refuses to start, or maybe I did :). Well, it’s okay, twice is better than never :).
This will be some kind of advice on how to give first aid to the system in case of its failure. I usually write similar tips and describe in them how to restore Windows 7 if a specific error occurs. But today I will write how to try to cure the system from various errors and problems when loading.
If you turn on the computer, but it frankly does not turn on. Well, you know how it happens, a certain error appears, a blue screen appears, or the computer simply reboots itself, then you need to try to start the computer with the last successful configuration with working parameters.If we talk about what might cause Windows to stop booting, there are a lot of options. For example, a failure may occur after installing some program or driver. After cleaning your computer from viruses. After incorrect completion of work (when, for example, there was a power outage). I had a problem where I normally turned off my computer in the evening, but in the morning it wouldn’t start, and it seemed like I hadn’t installed anything, but then this happened.
In such cases, the first thing we do is try to start the computer with the last known successful configuration. If this does not help, then you need to look for other ways to solve the problem, for example, searching by error. But as my practice shows, it very often helps to bring the computer back to life. Moreover, all these actions can be done in a few minutes. Now more details.
How to start Windows 7 with Last Known Known Configuration?
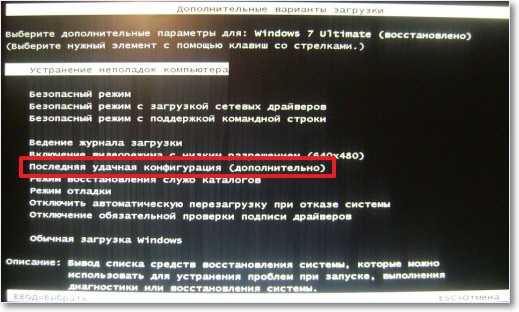
Everything is very simple. Reboot the computer and immediately actively press the key F8.
 A black window will appear with additional download options to choose from. Choose “Last Known Good Configuration (Advanced)” and press “Enter”.
What is the reason for Windows 7 not starting on my computer? The following factors may affect the possibility of an error when starting Windows: infection of the computer with viruses, malfunction of the hardware configuration, errors during software installation, imperfection of the operating system.
You need to find the true reason for issuing them; to do this, you must first understand what stages the Windows 7 download consists of. It consists of 3 main stages, which in turn are divided into stages:
Windows 7 boot stages
First stage – OSLoader
Immediately after the BIOS code is executed, the first boot stage begins. Here, at the first stage, the main drivers are connected, which are required to read data from the hard drive. After this, “winload.exe” begins loading the kernel, loading the “SYSTEM” registry hive into RAM, as well as the “BOOT_START” program.
The duration of the first stage is no more than three seconds. It ends when the Windows 7 logo is displayed on the monitor.
Second stage – MainPathBoot
MainPathBoot is the main and time-consuming stage. The duration sometimes reaches several minutes. The stage begins when the Windows 7 logo is displayed on the monitor and ends when the desktop starts to launch.
PreSMSS stage
The operating system kernel is determined, “plug and play” is loaded, “BOOT_START” programs and computer component drivers are determined. If errors appear, this indicates a problem with the computer components.
SMSSInit stage
Next, control passes to “SMSS.exe”. The remaining registry hives are determined and included in the operation of the “auto” type program. At the final stage, “Winlogon.exe”, the operating system login utility, takes control. "SMSSInit" is completed when the monitor displays a menu with user name and password.
Here errors indicate malfunctions of the video card or its drivers.
WinLogonInit stage
It starts with the launch of “Winlogon.exe” and ends with the appearance of the desktop by loading “Explorer.exe”. Includes the implementation of group policy scripts and loading services. This is the most processor-intensive step and usually takes a long time.
Here errors indicate problems with the services of programs not included in Windows, for example, an antivirus program.
ExplorerInit stage
Continues from loading the shell and ends with loading the window manager. During this stage, shortcuts begin to appear, and at the same time, programs that are in startup are loaded. This stage is characterized by the highest load on the processor, hard drive and RAM.
Here errors indicate defects in components or the need to upgrade them.
Third stage – PostBoot
Lasts from the moment the desktop is displayed and ends with the complete opening of programs from startup.
Errors indicate problems with applications that appear in the startup list or the presence of infected files on the computer.
Errors that occur during startup stages
By considering what errors occur at various stages of system startup, it is possible to identify specific problems.
Errors due to defects in computer components:
- Repeated errors of a driver indicate a hardware defect associated with this program;
- Multiple problems at various stages indicate a RAM defect;
- If there is no image on the computer monitor, but Windows sounds are present, this indicates that the video device is not working correctly;
- If it is impossible to start Windows or it is interrupted, you should check the serviceability of the hard drive;
- If there is a complete shutdown at startup, then the power supply or motherboard may have failed.
Missing or faulty boot files
The display of “Bootmgr is missing” on the monitor indicates the absence or malfunction of boot files, and sometimes there is simply a blank black screen.
 If the computer does not have the Bootmgr loader, the system will not boot. This partition is sometimes accidentally erased by the user himself when using a boot disk.
 Also, the necessary files to start the system are located on the C: drive in the Windows folder.
Registry problems
 Windows can sometimes restore it on its own using the Recovery Wizard.
Restoring the operating system startup
Recovery environment
Windows 7 has "Windows Recovery Tools WRT". To restore, you need to select “Troubleshoot computer problems” from the F8 menu.
 Next, the “System Recovery Options” menu will appear - you need to select “Startup Repair”.
 This will restore startup settings and files.
Recovery methods
In case of a software type error, “System Restore” will help the operating system. 
Manual recovery
If there is no positive result after using system tools, it is possible to manually restore the registry from a backup copy, which is located on C: in the WindowsSystem32configregback directory. You need to copy the files from it to the WindowsSystem32config directory.
File recovery
There is a useful program called "sfc.exe" that you can run in the recovery environment. You must specify the following: parameters and location of the download folder and offline directory system (Windows directory). The /offbootdir and /offwindir options.
If startup problems persist, you will need to manually restore the boot files.
Let's look at how to start Windows 7 system recovery.
In the second half of 2017, Microsoft plans to officially end support for the seventh version of Windows.
In this regard, many users try to find options for solving many errors and problems on their own.
According to the latest data from the company, updates for the OS are released much less frequently, and user support is provided only in really important cases. The corporation is placing all its emphasis on improving Windows 10. Insufficient system support leads to bugs and freezes.
Often, user actions are also the reason why the OS is too slow. Installing “heavy” games, programs, rebooting RAM and hard drive are the main factors of system failure. If you experience a sudden deterioration in your computer's performance, you should restore it. After this procedure, all PC functions will be fixed.
There are three basic recovery methods:
- Using the built-in assistant;
- Using system tools (BIOS, command line and others);
- Through third party programs.
Standard utility "Recovery"
By default, each copy of Windows 7 periodically creates restore points - an archived version of the last successful PC configuration that the user can use to restore.
Each such recovery point is stored on the computer’s hard drive. To select one of them, you need to use the standard Windows utility. This option is the simplest and is suitable only if the operating system boots normally and the function of creating archived copies of the OS is not disabled on the computer.
Follow the instructions:
1. Go to the PC control panel and enter “System Restore” in the search text field;
2. In the results tab, select the window of the same name and wait for it to open;
Rice. 2 – standard utility window
3. By clicking the “Next” button, you consent to the processing of your data by the system. The recovery process will only save those files and folders that were created before the date the access point you selected was added. The RAM and hard drive configuration settings also change. Also, drivers and other software will be updated to support stable operation of the system. Make sure your computer is connected to the Internet;
4. When choosing a restore point, pay attention to the date it was created. The save date must correspond to the period when Windows 7 was operating normally, without failures;
5. Click on the “Show other points” checkbox to see all the objects in the window. To see which applications the rollback process will work with, select the required point and press the “Affected programs” button;
6. Once you have decided on the choice of the created backup, click “Next”;
Rice. 3 – select a restore point
7. In the new window, confirm your choice. Don’t forget to check the properties of the point and the name of the drive with which it will work (to restore the OS, the system drive C must be indicated in the corresponding column);
Using Safe Mode
After serious errors occur in Windows 7, the system may not boot normally. To resolve this problem, it is possible to start in safe mode. It can be used to boot Windows specifically for troubleshooting purposes.
This download option lacks some standard services and options. Only the basic drivers and components that are necessary for the system to operate are launched. This option is suitable if you are unable to work due to a persistent error that shuts down your computer or causes it to freeze.
In safe mode, such errors will not appear, and you will be able to remove malicious programs or perform a system rollback, as described in the previous paragraph of the article.
Follow the instructions to start Safe Mode:
- Turn on your PC. Then press the Power key again;
- Open the start menu by holding down the F8, F12 or Escape key, depending on your PC model;
- After a few seconds, the Windows 7 boot options window will appear;
Rice. 4 – system boot parameters window
- Select “Safe Mode” by pressing the up and down keys, as shown in the figure above;
- Press Enter to perform the action.
After restarting your PC, you will be taken to the Windows 7 desktop, where you can perform a restore via an access point.
Remember! In this mode, it is not possible to use a global network connection. If you need Internet access to set up normal operation of the system, in the additional settings window, select “Safe Mode with support for network components.”
Automatic troubleshooting
You can also enable the troubleshooting option through Boot Options. It allows you to reset all errors automatically. Also, users have the option to enable the last good configuration of Windows 7. After selecting this feature, the OS desktop will boot as the last known good copy of the settings.
Follow the instructions:
- When turning on the computer, launch the system power-on options menu by holding F8;
- Select "Last Known Good Boot" and try to start Windows 7;
- If the startup attempt is unsuccessful, return to the system menu again and select “Troubleshooting”;
- The operating system will launch a utility to automatically correct all errors. After this, Windows 7 should start in its restored form.
Rice. 5 - Troubleshooting and launching a successful Windows 7 configuration
Recovery via command line
This option is suitable if there is not a single saved restore point on the computer, but you manage to start Windows 7.
Start your PC in safe mode with command line support. This will allow you to open a CMD window and work with basic commands.
Rice. 6 – select OS startup option
After turning on Windows 7, open the Run window and enter the following command in the field. It will run the line.
Rice. 7 – Run window in Windows 7
In the window that opens, type the command shown in the figure and press Enter. After a few minutes, a message indicating that the PC was restored successfully will appear. Restart it to exit Safe Mode.
Rice. 8 – fixing the system using Command Line
Recovery using a flash drive or disk
Due to fatal errors occurring in Windows 7, users are unable to start the system using Safe Mode. In this case, you can restore Windows using a boot disk or flash drive.
Bootable media is a removable device (usually a CD or flash drive) onto which an installation copy of the Windows operating system is downloaded. You can create such media on another PC using ISO Maker, Live CD, Daemon Tools and other utilities. If you still have a disk with an official copy of Windows, it can also be used to roll back the system.
Note! The versions of Windows 7 on the boot disk and on the computer must be the same. Otherwise, recovery will not be possible.
Before you start fixing the work using removable media, you should configure the component loading queue in the BIOS - the computer should load not the installed version of Windows 7, but the one located on the drive:
- Open the BIOS by pressing the F8 or F12 keys immediately after turning on the PC;
- Go to the Boot tab;
- In the window that opens, find the “Boot Priority” items - each of them means a specific boot order for PC components. Set the type of your bootable media first. In our case, recovery will be carried out from a flash drive, so in the first column “Boot Priority” we select “USB Storage”. If you are working with a disk, put the “Hard Drive” component first;
Rice. 9 – selecting the boot order of removable media in the BIOS
- Now, as a result of starting the computer, you will see the Windows installation window. Find the “System Restore” item and click on it;
Rice. 10 – recovery from bootable media
- Confirm the action again as shown in the image below:
Rice. 11 – select recovery option
- Click on the “Next” button and select an access point, as described in the first section of the article.
Rice. 12 – launch the standard utility
Using the AVZ utility
AVZ is antivirus software that quickly scans your computer for malware, incorrect settings, and Windows errors. The application is distributed free of charge and does not require installation. Suitable for use in systems of any capacity.
To perform Windows recovery in this program, just open the “File” tab in the main window. Then click on “System Restore”.
Fig. 13 – main menu in AVZ
In the window that opens, check the boxes for all system options that the program will work with. Click on the "Run" button. The list is quite extensive. We recommend that you select all items.
Doing these will increase the likelihood that Windows 7 will run smoothly after the application is terminated. Fixing your network, hard drive, search, and startup settings at the same time is the best recovery option for your operating system.
The occurrence of a problem informs the user that the system was unable to access the read procedure from the bootable media. Since the error appeared in an already installed system immediately after it was restored, we can say that its cause is a problem with the drivers.
Most likely, after the recovery procedure, the operating mode of the system disk was changed from IDE to AHCI, so the existing drivers were not suitable for booting the OS. You can solve the problem by disabling AHCI through the BIOS:
- Turn off your computer and open the BIOS menu;
- Go to the CMOS settings tab and select the SATA serial interface configuration item, as shown in the figure below;
- Press Enter and select the IDE option in the pop-up window;
- Save the settings, exit the BIOS and restart the computer.
Fig. 16 – switching SATA modes in BIOS
After turning on again, the system will complete the recovery and will work without failures.
Thematic videos:
System recovery Windows 7 and XP
This video tutorial will tell you how to perform a system restore in Windows 7 and XP, and in what cases a system rollback is needed
Good day!
No matter how reliable Windows is, sometimes you still have to deal with the fact that the system refuses to boot (for example, the same pops up), slows down, glitches (note: all sorts of errors pop up) etc.
Many users solve such problems by simply reinstalling Windows (a reliable method, but quite long and problematic)... Meanwhile, in most cases, you can quickly fix the system using Windows recovery (fortunately, such a function is included in the OS itself)!
In this article I want to look at several options for restoring Windows 7.
Note! The article does not discuss issues related to computer hardware problems. For example, if after turning on your PC nothing happens at all (note: more than one LED is off, you can’t hear the sound of the cooler, etc.), then this article will not help you...
1. How to roll back the system to its previous state (if Windows has booted)
If Windows has loaded, then that's half the battle :).
1.1. With the help of special recovery wizard
By default, Windows has system checkpointing enabled. For example, if you install a new driver or some program (which can affect the operation of the system as a whole), then “smart” Windows creates a point (i.e., remembers all system settings, saves drivers, a copy of the registry, etc.). And if problems arise after installing new software (note: or during a virus attack), then you can always return everything back!
To start recovery mode - open the START menu and enter “recovery” in the search bar, then you will see the desired link (see screenshot 1). Or there is an alternative link in the START menu (option): start/standard/system/system recovery.

Screen 1. Starting Windows 7 recovery
Note! Restoring the OS does not affect documents, images, personal files, etc. Recently installed drivers and programs can be removed. The registration and activation of some software may also fail (at least for the one that was activated and installed after creating a checkpoint, with the help of which the operation of the PC will be restored).

Then comes the most crucial moment: we need to select the point to which we will roll back the system. You need to select the point at which Windows worked as expected for you, without errors or failures (it’s most convenient to navigate by dates).
Note! Also check the box " Show other restore points". For each restore point you can see which programs it will affect - there is a button for this. Find affected programs«.
When you select a point to restore, just click “Next”.

After which all you have to do is confirm the OS restoration (as in screenshot 4). By the way, when restoring the system, the computer will restart, so save all the data you are currently working with!

After restarting the PC, Windows will “roll back” to the desired restore point. In many cases, thanks to such a simple procedure, it is possible to avoid many problems: various screen blockers, problems with drivers, viruses, etc.
1.2. Using the AVZ utility
An excellent program that doesn’t even need to be installed: just extract it from the archive and run the executable file. Not only can it scan your PC for viruses, but it can also restore many parameters and settings in Windows. By the way, the utility works in all popular Windows: 7, 8, 10 (32/64 bits).

Screen 4.1. AVZ: file/recovery.
By the way, the list of restored settings and parameters is quite large (see screenshot below):
- restoration of launch parameters of exe, com, pif files;
- resetting Internet Explorer protocol settings;
- restoring the start page of the Internet Explorer browser;
- reset Internet Explorer search settings;
- removing all restrictions for the current user;
- restoring Explorer settings;
- removing system process debuggers;
- unlocking: task manager, system registry;
- cleaning the Hosts file (responsible for network settings);
- removing static routes, etc.

2. How to restore Windows 7 if it won't boot
The case is difficult, but we will fix it :).
Most often, the Windows 7 boot problem is associated with damage to the OS boot loader, or a malfunction of the MBR. To return the system to normal operation, you need to restore them. More on this below...
2.1. Computer Troubleshooting / Last Known Good Configuration
Windows 7 is quite a “smart” system (at least compared to previous Windows). If you have not deleted hidden partitions (and many do not even look or see them) and your system is not “Start” or “Initial” (in which these functions are often not available), then if you press several times when turning on the computer F8 key, you will see additional download options .
The bottom line is that among the boot options there are two that will help restore the system:
- First of all, try the item “ Last Known Good Configuration". Windows 7 remembers and saves data about the last time you turned on the computer, when everything worked as expected and the system was loaded;
- if the previous option did not help, try running “ Troubleshooting your computer«.

2.2. Recovery using a bootable USB flash drive
If nothing works and the system still does not work- then for further Windows recovery we will need an installation flash drive or disk with Windows 7 (with which, for example, this OS was installed). If it doesn’t exist, I recommend this note, it tells you how to create it:
To boot from such a bootable flash drive (disk) - you need to configure the BIOS accordingly (more about setting up the BIOS -), or when turning on the laptop (PC), select the boot device. Also, how to boot from a flash drive (and how to create one) is described in detail in the article about installing Windows 7 (especially since the first step in recovery is similar to the installation step :)).
The Windows 7 installation window has appeared... What's next?

In the next step we choose not to install Windows, but to restore! This link is located in the lower left corner of the window (as in screenshot 7).

After you follow this link, the computer will search for OSes that were previously installed for some time. After which, you will see a list of Windows 7 operating systems that you can try to restore (usually there is one system). Select the desired system and click “Next” (see screenshot 8).

- Startup recovery- Windows boot record (MBR) recovery. In many cases, if the problem was with the bootloader, after working with such a wizard, the system begins to boot normally;
- System Restore- system rollback using checkpoints (discussed in the first part of the article). By the way, such points can be created not only by the system itself in auto mode, but also by the user manually;
- Restoring a system image- this function will help you restore Windows from a disk image (if, of course, you have one :));
- Memory diagnostics- testing and checking RAM (a useful option, but not within the scope of this article);
- Command line- will help to carry out manual recovery (for advanced users. By the way, we will also partially touch on it in this article).

Let's look at the steps in order that will help return the OS to its previous state...
2.2.1. Startup recovery
See Screen 9
This is the first thing I recommend starting with. After launching this wizard, you will see a problem search window (as in screenshot 10). After a certain time, the wizard will report whether problems have been found and resolved. If your problem is not resolved, move on to the next recovery option.

2.2.2. Restoring a Previously Saved Windows State
See Screen 9
Those. roll back the system to a restore point, as in the first part of the article. Only there we ran this wizard in Windows itself, and now using a bootable flash drive.
In principle, after selecting the bottom option, all actions will be standard, as if you had launched the wizard in Windows itself (the only thing is that the graphics will be in the classic Windows style).
The first point is to simply agree with the wizard and click “Next”.

Screen 11. Recovery Wizard (1)

Screen 12. Restore point selected - Restore Wizard (2)
Then you confirm your intention to restore the system and wait. After restarting the computer (laptop), check the system to see if it boots.

Screen 13. Warning - Recovery Wizard (3)
If the restore points did not help, the last thing left is to rely on the command line :).
2.2.3. Recovery via command line
![]()
See Screen 9
Command line- there is a command line, there is nothing special to comment on here. After the “black window” appears, enter the two commands below in sequence.
To restore the MBR: you need to enter the command Bootrec.exe /FixMbr and press ENTER.
To restore the bootloader: you need to enter the command Bootrec.exe /FixBoot and press ENTER.
By the way, note that on the command line, after executing your command, the response is reported. So, for both commands above the answer should be: “ Operation completed successfully". If you get a different response from this, it means the bootloader was not recovered...
PS
If you don’t have restore points, don’t despair, sometimes you can restore the system like this: .
That's all for me, good luck to everyone and a quick recovery!Thanks in advance for any additions on the topic.