DIY laptop stand. DIY laptop cooling pad DIY laptop cooling pad
A DIY laptop stand with cooling allows you to speed up your device and prevent constant freezes and shutdowns.
The cooler does not have to be purchased in specialized stores.
You can assemble such a simple and very useful design yourself, spending a minimal amount.
Using a laptop, users can work anywhere because the device is easy to move. To maintain normal operation of the device, follow these recommendations:
Content:Paper container stand
One of the simplest and most affordable ways to create a cooler with your own hands is the option using stationery.
On the shelves of any supermarket you can find flat paper holders made of metal mesh. The price of such a tray does not exceed 300 rubles.
To design our own unique laptop cooling system, we need a stand of approximately the following shape:
Select the dimensions of the product individually, based on the size of your gadget. The advantage of such a stationery piece is that it can change shape.
If you don't find a flat stand, take any other one. With a little effort, change its shape and proceed to further work.
Take a regular pan stand and cut a circle along its diameter in the center of the tray:

Rice. 3 – creating a hole in the cooler
Now you need to attach a stand for kitchen utensils to the resulting circle.
You can also purchase it at any household goods store (the cost varies between 40-100 rubles). We recommend choosing the metal option.
It should look like this:

Rice. 4 – fastening of elements
Now take the fan mechanism. It can be purchased separately at a computer store. An ordinary plastic part will not cost more than 200 rubles.
It consists of a rotational element and, through which we will connect the resulting one to the laptop. Secure it under the tray using bolts.

Rice. 5 – installation of the fan mechanism
As a result, we get an excellent laptop cooling system from scrap elements, which in its characteristics is in no way inferior to store-bought devices for several thousand rubles.
You can also choose the power and speed of air circulation yourself at the stage of purchasing a ventilation mechanism.
A simple design made of polystyrene foam and a homemade fan
This method is suitable for those who want to save as much as possible, because the resulting fan will cost you several tens of rubles, and it can be made from any bottle and a piece of polystyrene foam.
The base of the structure will consist only of foam plastic.
In order for the product to last longer, we recommend taking dense extruded foam or polystyrene foam (sold at any hardware store).
Cut it to the shape of your laptop.
The design of the cooler should not be adjacent to the table surface. It is advisable to make 4 more small figures from foam plastic, on which the product will stand.
This will ensure better air circulation.
Please note that the correct position of the cooler implies a slight inclination towards the user, so make one part of the legs 3 centimeters high, and the other two centimeters high.
Accordingly, the first two parts will be the rear support.

Rice. 6 – creating a frame for the stand
You can fasten foam parts together using simple PVA glue or superglue
Wait until the fastener is completely dry before proceeding to the next steps.
Cut out 4 more small squares and attach them to the corners of the top of the cooler to create a look like this:

Figure 7 - creating the front part of the cooler frame
When you place your laptop on the product, it will not be flush against the frame, creating more space for air flow.
All 4 small squares should be the same height. As shown in the picture above.
Now we need to create a ventilation mechanism. It will be made of ordinary plastic. Take any bottle, cut off its top and create the following part:

Rice. 8 - creating a fan
The resulting element will become the basis of the fan. In order for the blades to rotate, forming a directed air flow, it is necessary to slightly change the shape.
To do this, take a candle and light it. Bring the fan to the fire and warm up the base of each blade, immediately twisting them in one direction:

Rice. 9 – shaping the blades
Make a hole in the center of the cooling system, based on the size of the fan.
If the blades are too long, cut them off and fire the edges again to smooth them out.
Take 4 popsicle sticks and secure them to act as a stand for the vent. You can fasten the sticks together using regular adhesive tape.
It is better not to use glue. Position the fan as shown below.

Rice. 10 – creation of a cooling structure
Take a simple motor mechanism (available at any electronics store) and attach a bottle cap to the outside of it. Place the resulting part in the center of the blades:

Rice. 11 – creation of cooling
Take a USB cable and solder it to the motor. The structure is ready. Now you can decorate it by painting it in any color.

Fig. 12 - checking the operation of the device
4 ways to cool a laptop without a cooler
Advanced users can easily upgrade their laptop to allow better airflow and faster cooling.
There are 4 common life hacks that will help cool your laptop without using a special stand:
- Remove any covers from openings that allow air to pass through. . This way, the air will circulate inside the laptop much faster and the fan will evenly distribute it to the surface of the motherboard and central processor.
Remove the back cover of the laptop and simply peel off all the metal mesh that is located on the grilles to allow air to pass through;
- Mechanical cleaning of the fan. In 90% of cases it consists precisely in other fine particles.
Even the best cooling pad can't help your laptop perform better if the inside of the device is full of dust.
You need to open the laptop yourself or with the help of a specialist and clean the part using dry cotton swab or brush.
After cleaning the component, a substance should be applied to the surface of the motherboard parts (usually the video card and processor) to improve heat transfer between them.
Over time, the existing paste layer becomes unusable.
After mechanical cleaning of the built-in cooling system, you will immediately notice improvements in the performance of your PC. It will no longer overheat or freeze.

Fig. 13 – cleaning the device fan
- Cleaning the fan processor. If the structure of the laptop allows it, you need to not only clean the fan, but also remove it from the case and disassemble it. Then you should wipe each of its elements separately, because even inside the part itself a huge amount of dirt accumulates;
DIY laptop cooling pad
DIY laptop stand with cooling
Computer equipment surrounds us everywhere: at home and at work, in transport and on vacation, but it’s no secret that it requires proper care and handling.
For example, a laptop needs a special stand that will help cool it, and therefore extend its service life. In addition, the laptop on it is located at an angle, and it is more convenient for us to use it in this position.
We all understand that modern computer technology is becoming an integral part of our lives. Just recently, we could not even imagine that even small children would easily master computer literacy. Personal computers and laptops, tablets and e-readers, printers and scanners, game consoles and smartphones, video recorders and navigators have become such familiar gadgets as televisions. Today it is already difficult to find a house that does not have at least some of them.
Let's try to make a laptop stand with our own hands.
Step 1: Selection of materials and tools
Selection of materials and tools
We will need:
- about one and a half meters of PVC tube (2cm in diameter),
- connecting PVC elbow (2cm in diameter), 90o – 6 pieces,
- hacksaw or mechanical jigsaw,
- a bottle of spray paint of any color,
- marker,
- roulette,
- sandpaper,
- damp cloth,
- glue for PVC products (optional).
Step 2: Marking the PVC tube
PVC tube marking 
1. Stretch the tape measure along the entire length of the PVC tube, starting from the left edge.
2. Using a marker, make marks on the tube at distances of 25cm, 43cm, 61cm, 67.5cm, 74cm.
Step 3: Segmentation
Segmentation
1. Grasp one end of the tube with your left hand and press the other end to the table.
2. Take a saw or jigsaw in your right hand and cut the tube into segments according to the markings.
Step 4: Arranging the Segments
1. After cutting the tube, arrange the segments on the table in order (from smallest to largest).
Step 5: Assembling Part A

1. Take a 25cm piece of tubing and attach connecting elbows on each side.
2. To attach the elbow, insert one end of the tube into the hole in the elbow.
3. Twist the tube from side to side to make insertion easier.
4. Make sure both knees are pointing in the same direction.
Step 6: Assembling Part B
Attach one piece of tubing 6.5 cm long to the free end of each of the two elbows.
Step 7: Assembling Part C

1. Attach 1 more elbow to each free end of the segments (6.5 cm).
2. Position each knee so that the free end is up.
3. Temporarily set this structure aside.
Step 8: Assembling Part D
1. Attach one of the remaining elbows to each 18cm piece.
Step 9: Final Assembly
1. Connect one of the 18cm lengths (with an elbow at the end) to the free elbow hole of the finished triangular structure.
2. Repeat the same procedure with the second 18cm piece.
3. Point your free 2 knees towards you.
Step 10: Troubleshooting
1. Twist each elbow-tube connection to ensure a secure connection.
2. Measure the corners. Turn the entire structure upside down, lightly press it around the entire perimeter to make sure that all four points of contact between the structure and the table are stable.
Step 11: Folding for Storage
Fold two 18cm lengths of PVC pipe inward until they create a rectangular structure.
Step 12: Optional Final Step
Ready stand
1. Glue all structural elements together using PVC glue.
2. Wipe the structure with a damp cloth to remove all dirt.
3. Paint the structure with spray paint.
The laptop stand is ready!
Greetings to all Habrousers, today I will tell you how I made a simple and fairly budget-friendly cooling pad for a laptop.
For this we need:
1) A folder for A4 sheets, with as rough cardboard as possible, in my case it is folder with arched clip, looks like this:

2) Computer fan measuring 120 by 120 mm:

In my case, this is one of the most budget fans Gembird FANCASE3, designed for 2100 rpm, that is, “hums like a vacuum cleaner,” but, nevertheless, it has been unscrewed in my old computer for about three years and is still working.
Of course, you can take smaller fans, but the 120s have the optimal price/performance/noise ratio.
3) Dismountable USB plug type A (male/male):

You can, of course, unplug the USB extension cable, but it’s somehow a pity to “put it under the knife.”
4) Centimeters from 10 wires, if you decide to do it, as I:

5) A knife, preferably sharp, a screwdriver, a marker/pen, electrical tape or heat shrink (not included in the lens frame, but they are there).
Manufacturing:
First, we need to choose a place where the fan will be, I recommend choosing as close to the end of the folder as possible, and of course we take into account the location of the ventilation holes of the laptop and also, it is advisable to install the fan directly under the hottest parts of the laptop, this is usually the processor or video card, or both in one person (video card integrated into the processor), like mine, for example. Someone will probably ask, if you have an integrated video card, then most likely there can be no overheating, then why bother with an additional cooling system? The answer is simple - purely sporting interest, the idea is very simple, and I had everything except the folder in stock.
After we have chosen the optimal location of the fan, or fans (yes, yes, the size of the folder allows you to install two 120 mm fans, if necessary, and this will also give the entire structure rigidity, which is clearly not enough here, but more on that later), you need Mark the part that needs to be cut:

Then you need to mark the holes for the fan screws:

This can be done conveniently using a ballpoint pen:

We are assessing whether we have calculated correctly, both on the outside of the folder, where the laptop will be, and on the inside, where the fan itself will be.
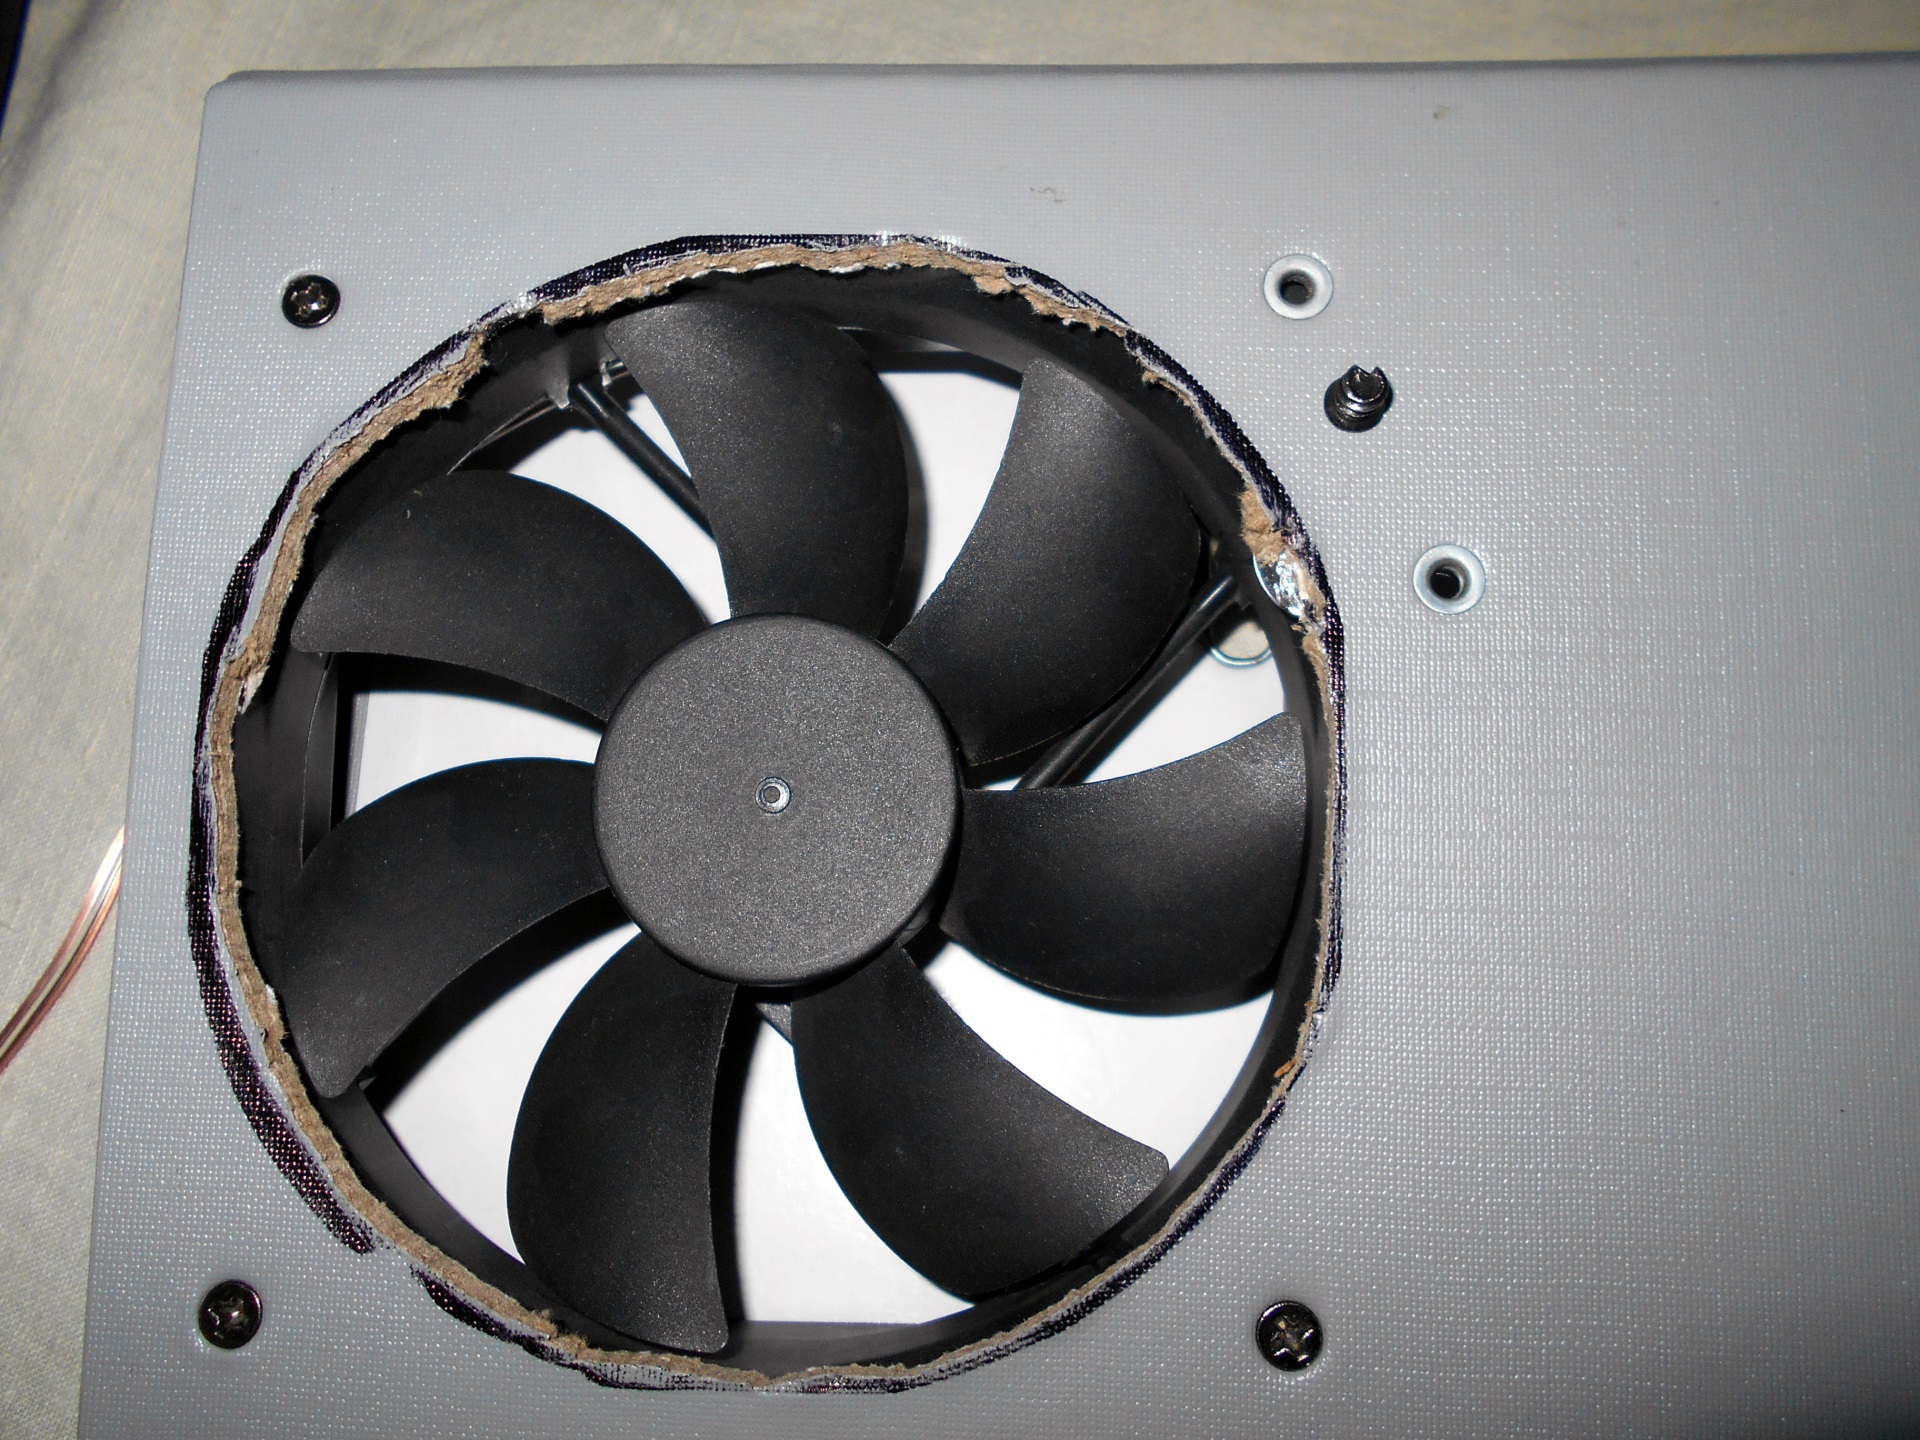
As you can see, I was unable to make a hole for the fourth screw, so the fan is held on by three.

The distance from the end of the folder was approximately 25 millimeters, but I did it specifically for my laptop so that the fan was as close as possible to the hot parts of the laptop.

As you can see, I can’t really draw, so here’s a picture from Wikipedia:

Usually, The red fan wire is positive and the black wire is negative., yellow is RPM monitoring, we are not interested in it, just like the D+ and D- USB contacts. So, uh It is IMPORTANT to insulate everything after connecting the wires, so as not to accidentally short circuit your laptop, which could negatively affect your pet, and don’t say that I didn’t warn you.
If you still want to make a USB connector from a USB extension cable, then it’s the same, the red wire is a plus and the black wire is a minus.
Of course, reduced power will affect the fan speed, they will drop by at least half, so I think 800 rpm fans will not work for this, they may not start at all, ideally something at 1700-2500 rpm. But noisy fans, as a rule, become quiet at such speeds and have more or less some kind of air flow.
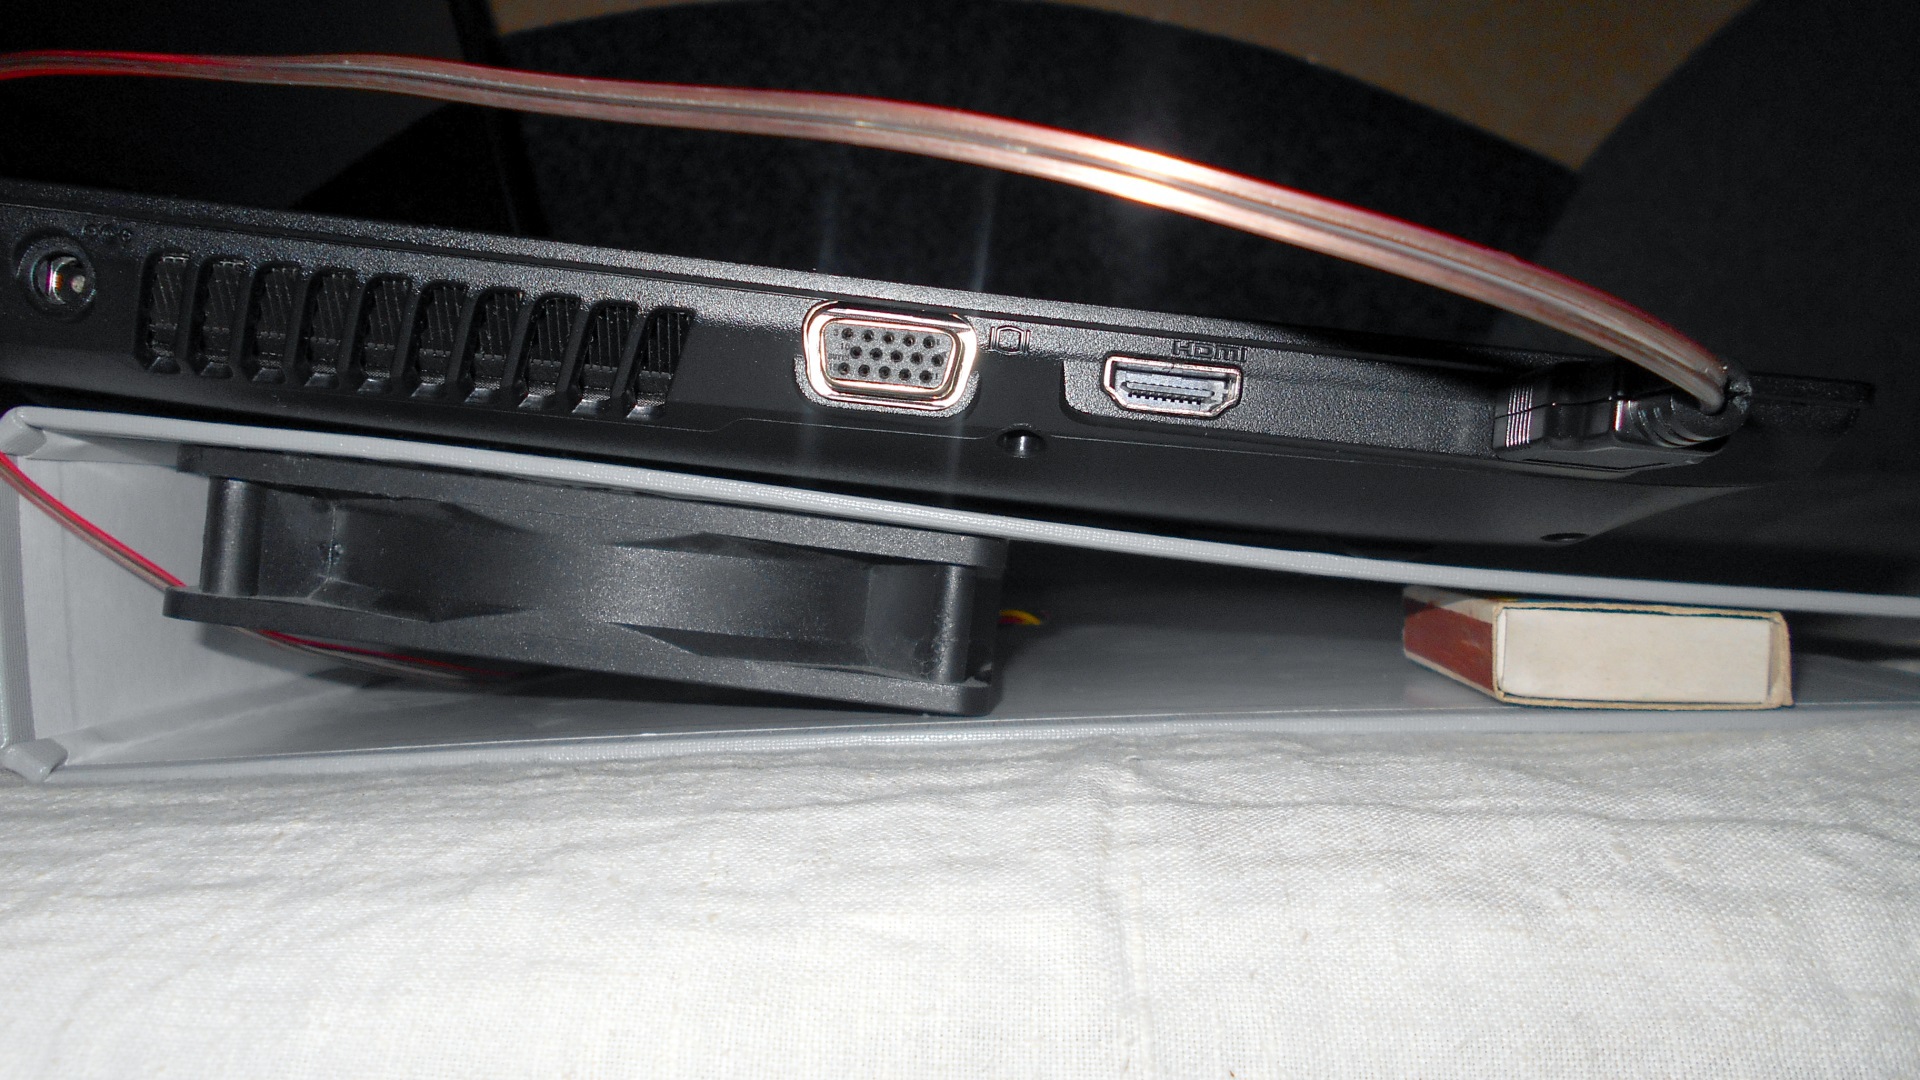
And a few more words about installing the fan, I think that it is better to install the fan so that it blows air from under the bottom of the laptop, that is, “stands blowing out,” as they say among hardware specialists. Of course, no one forbids putting it the other way around, but then it will blow all the dust into the inside of the laptop, think about whether it is appropriate to clean the laptop cooling system or not?

The air flow, as well as the direction of rotation of the fan, are indicated on the side of it.

As you can see in the photo, I removed the arched clamp, it was in my way, I believe it will be for you too, just carefully pry it off with a screwdriver, however, everything is visible in the photo.
Advantages and disadvantages:
On to the pros we can attribute the ease of manufacture, I think it won’t be difficult for anyone to make such a stand, after so many photos that I took, cheapness and flexibility, you can make it specifically for your laptop, for the location of the ventilation holes of the laptop, the pleasure of making something with your own hands, Anyone can buy.
On to the cons You can attribute the flimsiness of the design, just take a look:

It seems to me that this is not entirely good, if you have any ideas or thoughts, write in the comments, or I have links to Facebook and VKontakte in my profile. So far I have decided for myself this way:
Although, I think it would be more correct to do something like this:

Another disadvantage would probably be the low efficiency; during tests, my temperature dropped by only 2 degrees, but I believe that this is a drawback of the laptop cooling system itself; if you unscrew the bottom cover to pull hot air directly from the heat pipes, there will be a drop in temperature obviously higher.
And the last drawback - since my fan is old, 3 years old, after all, for a motor with a plain bearing this is a long line, even for a brushless one, there is a slightly noticeable “hole”, I believe that this is due to wear of the bearing.
Any user of a personal computer, sooner or later, thinks about the need to increase the performance of the operating system, reduce the noise emitted by computer components, and also achieve greater cooling of the components of the system unit or laptop, which to some extent will lead to improved performance of the computer as a whole. If for owners of desktop computers everything is quite simple, just open the lid and simply clean the components from dust or, if necessary, replace the cooling system, fortunately this is done once or twice, then for owners of laptops/netbooks everything is somewhat more complicated. Of course, many modern gaming devices are already equipped with a liquid cooling system, which allows, in principle, not to pay much attention to such issues.
A method for making a cooling pad for a laptop yourself.
For the general segment of laptop computers, there are not many ways to achieve more power from the existing cooling system - this is the same as cleaning the fan blades from dust, or physically replacing it, which does not always actually improve temperature performance. In this case, specialized stands will come to the rescue, which are a metal or plastic substrate, inside of which there is a fan, or more commonly known as a cooler that operates on blowing or blowing. Such systems can be freely found in any computer store, as they are in regular demand and have a reasonable price. But, as mentioned above, the principle of their operation is elementary - these are 1 or 2 large “burdocks” that are powered by the computer using a regular USB cable. So why not make a stand like this yourself, add a unique design to it, and save some good money at the same time? This is exactly what this article will discuss.
Of course, everyone needs to sensibly assess their capabilities both in the selection of components and in their installation and, in principle, be aware of the feasibility of the intended action. So why is it beneficial? For example, we have an ASUS K95VJ laptop with a screen diagonal of 18.4 inches. The search for the cooling system in question found that all noteworthy options cost about 2,000 rubles and more. Indeed, taking into account modern realities, this amount does not seem significant, but I also don’t really want to pay that kind of money for a beautiful backlit case, which is essentially a dummy. And in principle, this is a rather dubious investment of funds, the savings of which can, for example, be invested in the purchase of components. That is why the author of this article, like many other users, set out to make a cooling pad on their own with a minimal investment of money and time.
Where to begin
As with any work process, you should start by drawing up an estimate/plan and determining future stages of installation, which will be discussed below.
1 Step. Drawing up estimates and schematic plans
- To get started, it’s worth answering a few questions:
- “What expectations are placed on the future creation” - for example (for the author of the article hereinafter), this is a convenient substrate located at a slight angle, and 1/2 cooler for blowing in and out. And the goal is to achieve a decrease in temperature indicators by at least 5 degrees.
- “What amount can be allocated for this” - budget 500 rubles.
- “What size/dimensions” - since the device has a diagonal of 18.4 inches, taking into account the location of its legs, the length will be about 36*38 cm, width 35-37 cm.
- “What to make the body/base out of.” Taking into account that the ASUS K95VJ weighs more than 4 kilograms, the material must be durable, but at the same time it is desirable to achieve small dimensions and lightness. Polypropylene water pipes with a diameter of 20 mm should have been able to cope with these requests quite easily.
- “What to make a substrate for attaching a cooler from” - the weight of the cooler is minimal, and there will be no load on the substrate, so it is not required to be excessively strong. Accordingly, the choice fell on an assortment of stationery, namely a binder with a metal clip and the most dense/rough cardboard.
- “What is already available” - there is already an old cooling pad from a device of the same brand “Asus”, but with a screen diagonal of 13 inches, from which you can remove the cooler and power port.
- “What additional tools/items will be required”:
- Ruler, meter or tape measure.
- Stationery knife or scissors.
- Drill/screwdriver, drill bits and screwdriver.
- Metal hacksaw or jigsaw.
- Marker, electrical tape.
- Bolts, nuts, washers.
- Glue gun or double-sided tape.
- Furniture stapler or regular transparent tape.

Step 2. Purchasing materials
Considering that the list of items and tools given above does not require additional costs, since any average man has all this, all that remains is to purchase:
- “polypropylene pipes” - 1.5/2 meters of pipe (with a margin) on average costs about 100 rubles (in the example, in fact, it turned out to be 75 rubles * 1.5 m).
- “Angles and tees” - four 90-degree angles and two tees - cost a total of 27 rubles.
- “binder folder” - from what we managed to find in the nearest stores, there was a folder with quite thick cardboard costing 120 rubles.
Total: 222 rubles.
Installation
Taking into account the above diagram, the immediate installation process should also be divided into two parts: the first is the assembly of the case, the second is the assembly and installation of the substrate with the cooling system.
Frame
It is worth noting that further on, for the frequency of narration, individual indicators will be described that correspond to the request and size of the laptop. It would also not be amiss to explain that the author’s mastery of tools is at an ordinary everyday level, so there are roughnesses and unevenness in the details and, in general, the final result does not claim any visual and aesthetic laurels.
So let's get started:

Fan
As mentioned above, the old device has a fan with a power button and a port for connecting a USB cable. Separately, a board with a speed controller and several lighting elements were purchased for a total cost of 100 rubles, which increased the total amount to 322 rubles. The rest of the procedure is as follows:

Here it is worth saying a few words about how the fan should be positioned correctly - for blowing or blowing. Opinions differ in this case; some believe that if you supply air directly to the laptop case, then dust will clog into the ventilation holes, which will increase the frequency of cleaning the computer from dirt, but will cool it to a lesser extent. We should partly agree with this statement. Therefore, as mentioned above, it is planned to install two elements in the stand, one will work to supply air to the case, the other will work to remove it from the case, which will allow for better circulation.

Here it should also be explained why the cooler is installed in this way in the figure. The fact is that the old cooling system had a fan that was attached directly to the plastic substrate, which did not imply its installation in the manner in question. Therefore, it was necessary to cut out its holding plastic part and place it so that the blades were below the level of the cardboard. This was easy to achieve - just use three screws, nine nuts and six washers. That is, the connection has the following scheme - screw-washer-washer-nut-housing-nut. This scheme allows you to lower the fan to the desired depth and at the same time achieve its strong fixation.

Power and lighting
The final stage consists of installing power ports, a board with a speed controller and, if necessary, lighting elements. The ports and board were placed on the left side of the stand and a glue gun was used to secure it. If you don't have it, you can use double-sided tape. The backlight, purchased at a service center for mere pennies along with the board, is short in length, so it was placed only on one side of the laptop and secured with electrical tape.

Alternative
As an alternative, and perhaps even more budget-friendly, option, we can highlight a fairly popular scheme, where only the resources of a folder are used as a stand. The installation principle is the same: cut a hole for the cooler, secure it and make tilt angle limiters. This option was not considered, since the laptop weighs more than 4 kg. and has significant dimensions, there was a high probability that such a cooling system simply would not withstand it.
Conclusion
In conclusion, it would not be amiss to repeat once again that the end result is a mixture of ordinary tool skills and minimal cash costs. Now directly about the actual benefits of the created additional cooling system. Temperature testing was carried out after 20 minutes of active web surfing and watching a movie.
Figure 1 shows testing data starting from the 20th minute of operation.

Figure 2 shows the indicators for the period from 20 to 30/31 minutes of active work. As you can see, the declared result of 5 degrees was achieved without any problems.

Yes, we can’t say that these are outstanding results, but taking into account the actual costs and time spent, creating a cooling pad yourself pays off in full.
Which includes various interesting things of the electronic or near-electronic direction. Some, in our opinion, some of the best publications, we will broadcast in their entirety on the blog on Lifehacker.
A laptop is the ideal solution for working on the road. But at home or in the office it is much more convenient to use it by connecting a regular “large” keyboard. If you also raise the screen to eye level, you can forget about the pain in your neck from a constantly crooked posture, and your eyes themselves don’t get so tired when working.
To do this, a simple stand is made from scrap materials. It is compact, lightweight, and can always be disassembled and taken with you. With a stand, the workplace is used more rationally - the laptop, due to its tilt, takes up less space on the table, and it is convenient to put keys, a phone and other small items under it.
Convenient stationary workstation based on a laptop in 2 minutes
Laptops come in different sizes, so it’s easier to make a stand yourself than to buy, but before you make the final version, you need to practice on “cats” - cardboard boxes. And after that, you can sculpt a stand from plywood, plastic, or any other sheet material of the desired color + stick on appliqués, if there is such a need. And don't forget to put felt pads under the plastic to avoid scratching the table.
The production technology of the stand is extremely simple.
Step 1
Draw or print the pattern. It should be taken into account that part 1 on the pattern is only half of the real part, so circle it again symmetrically with the right (as you can see on the pattern) vertical edge. Detail 2 is a profile view of the stand.