If the computer doesn't see it. Guide for when the computer does not see the flash drive
Sometimes at the most inopportune moment, when you urgently need to transfer information from a flash drive to a PC, the computer refuses see new device. Exactly about reasons for the occurrence We will try to describe this problem and options for its solution in detail in our article.
Hardware faults
 So, if your the computer doesn't seeUSBflash drive, then the first thing you should do when you detect a problem is to check the serviceability of the flash drive and USB connector. A properly functioning device connected to a working port will have a steady blinking indicator light. If the indicator blinks and the computer still does not recognize the flash drive, then the problem should be looked for in the operating system.
Lack of nutrition
Quite often a flash drive does not function when connected to a port located on front panel of the unit. It happens that such connectors are simply not connected to the main power supply, and sometimes they receive insufficient power. In this situation, you need to try connecting the device to a free port on the back board of the computer.

The flash drive may not work when there is a lack of power. This happens when there is excessive current overload in the USB ports or USB hub, or when the power supply is malfunctioning. In addition, it happens that the computer does not see the flash drive because it is too large, but as a rule this is rare.
Flash drive malfunction
If, after completing all the previous steps, the computer is still doesn't see the flash drive, then the reason may be in the device itself. Should try connect it to another computer. If the USB memory does not function on other PCs, then we can confidently say that it is faulty. It should be taken to a competent specialist for diagnosis.

It is possible to repair a flash drive, however, very often repairs are more expensive than cost. Therefore, it is worth repairing the device when absolutely necessary. In other cases, it is cheaper to buy a new drive.
BIOS Settings
The problem is sometimes hidden in the settings of the current operating system. For example, The computer does not recognize the flash drive, unless USB support is activated through the BIOS. When the BIOS setting is complete, a message may appear that says " USB device not recognized" This may be due to the reasons discussed below.
The flash drive is automatically assigned a busy letter
A very common problem is when the system assigns a connected drive letter to a device that is already occupied. You can troubleshoot this way:

It happens that The computer does not see the USB flash drive, because the necessary ones are missing or outdated. In this case, updating your motherboard drivers will help. The name of its model can be viewed through the Everest program. Drivers should be download from the developer's official website.
USB driver missing
Sometimes there is no special driver on the computer and it is for this reason The computer does not see the flash drive wherever we put it. You need to check this guess like this:
- We go through Control Panel on the menu device Manager;
- In the proposed list of devices you need to find USB controllers. One or more USB devices, if there is no driver, will glow with a yellow question mark;
- You should remove the malfunctioning device and install it again.
Viruses in the system
Sometimes the correct functioning of a flash drive is affected by viruses in the operating system. In this case, you need to scan your computer with an antivirus program and.
File system incompatibility
Another reason why the computer does not see the flash drive may be that the computer is unable to read file system. This most often occurs when a file drive is installed on the flash drive. FAT system. You need to try to run devices on the system NTFS or FAT32.

As you can see, incorrect operation of a flash drive can be caused by hardware or software problems. That is why in each individual case it is necessary to sort out different possible causes.
In recent years, flash drives have become very popular and almost every PC user has one. It has become the norm that almost every second person constantly carries a flash drive with all the necessary information. And this is not surprising, because a memory card is much more convenient than a previous generation storage medium, for example, like a disk.
Compactness and accessibility are not the main advantages of flash media. Users appreciate it primarily because all files for work or study are always at hand and, if necessary, they can be erased or overwritten.
But no technology is absolutely perfect. Problems such as the inability to read or open files are becoming more common. The reason may lie either in the storage media itself or in the computer. And this is deplorable because in an instant you can lose all files with important information. That’s why it’s worth knowing why a flash drive stops working and all possible methods to fix the problem.
Non-working flash drive
Let's start with the worst, namely that the problem lies in the fact that the media has failed. Indeed, in this situation, repairing it will be almost impossible or unreasonably expensive.
Mostly, flash drives break after rough impact on the controller or chip, as well as due to short circuits and failure of contacts on the board. It happens that after getting into the water the carrier remains working and users only breathe a sigh of relief. But in vain! After the flash drive gets into the water and turns out to be working, you should immediately rewrite all the files to another medium. After all, just because it works correctly does not mean that after a while it will be the same. Moisture and electronics, although very small, are completely incompatible things and almost never their contact goes unnoticed.
Also, if the computer does not see the media, you first need to determine the reason. You need to inspect the body of the device for cracks and dents. Naturally, if the flash drive is completely smashed, it is useless to do anything at all.
But if you still have doubts about the device’s inoperability, you need to move on. It's easy enough to check if it works. You just need to insert the flash drive into your computer. If the device lights up (there is an LED built into the case) and the computer beeps when the device is connected, then the flash drive is working. This means the problem can still be fixed.
But if the carrier itself did not react in any way, like the PC, then it is useless to do anything. You can, of course, contact an electronics repairman or service center. They will try to resolder the contacts and may even replace the broken case, but this will be very expensive. It is easier to buy a new flash drive, unless, of course, there are vital files on the old one.
Is the flash drive showing signs of life? So, we look for the problem further.
De-energized USB port on the front panel of the PC
The most common reason why a computer does not see a flash drive is a de-energized USB port on the front panel. Many users automatically connect the flash drive to the computer through the front panel. It's easy and convenient. And somehow we completely forget that these are not the only ports on the PC.
This problem is especially likely after the PC has been repaired or cleaned from dust, replaced thermal paste, or any other activity that includes disassembling the system unit. It’s just that at the time of its assembly, due to forgetfulness, you may not connect the front ports to power. The problem is simple and easy to solve.
If you need files right here and now, you can simply use other ports. They must be working if the problem really is hardening of the front ports. If the flash drive works and the rear ports too, then there will be access to files. This can be called the first way to solve this problem. But after that, it’s still better to spend a little time and connect them, because habit is a gainful thing.
But method 2 already takes time. You need to connect the motherboard power cable to the front panel of the PC. The connectors may be different, depending on the case model. But it’s practically impossible to get confused in them, since each cable has markings and the whole structure is designed, so you need to try hard to connect a “foreign” cable.
But still, in different models there are wires of such types as “VCC”, “D-”, “D+”, and also “GND”. Also, those who are afraid of messing things up and doing something wrong can look at the color coding. As a rule, wires and connectors have the same markings. But just in case, you need to pay attention to the inscriptions.
First you need to gain access to the motherboard itself. To do this, you need to carefully unscrew the bolts holding the cover in place and remove it. It is recommended to put the bolts in one place so as not to lose them. After this you need to find the cable leading to the front panel and find the connector on the motherboard. Their markings must match. And so you can work on the principle of exclusion. If only one power cable is not connected, then its connectors are free. But you still need to carefully look at the color and letter markings.
Once the connector of the desired color is found, you need to carefully insert the power cable into it. Then, without assembling the case, turn on the computer and check the functionality of the front panel. If everything works well, then great; if not, then you should check the labeling more carefully.
If you cannot connect the cable due to fear of burning the contacts, it is recommended to call a specialist. A qualified specialist will do this work once or twice, and your equipment will work as before.
Malfunctioning or disabled USB port
In some cases, the problem that the computer does not see the flash drive is not the storage media itself, but the connector where it is connected. For example, a port may simply not work due to damaged contacts in it. And this port will not see not only the flash drive, but also any other device connected through it.
The problem can be easily solved if you have a little knowledge of circuit design. You just need to patch up the soldering iron contacts. But if such knowledge is completely absent, then the computer must be taken to a service center. There, problems can be quickly resolved for a small fee.
But it’s worth noting that if not a single port is working, then the problem may lie much deeper. For example, this may happen because the ports are disabled in the BIOS.
To reconnect the ports in the BIOS settings, you must first go into it. To do this, you need to restart the computer and press the F2 key in the first three seconds of the reboot. After this, the BIOS window should open. On different models, the keys for calling up the BIOS may differ. As a rule, they are marked.
To connect ports you need to follow the instructions:
- After the BIOS is opened, you need to go to the Advanced Settings menu and select the USB configuration.
- Find the line “USB Controller” and set the value opposite it to “Enabled”. This will allow you to use the ports.
- After all the above manipulations, you need to save the changes by pressing the F10 key. This will not only save the changes, but will also exit the BIOS.
Now that we can say with confidence that the ports are connected, we need to check them. To do this, you need to connect a flash drive through one of the ports and make sure that everything works as it should. If the computer still does not see the flash drive, then the problem lies elsewhere.
Dirt and dust in the flash drive connector
Due to the fact that the flash drive is very compact, you always carry it with you in your pocket or bag. Some even attach it as a squirrel to their apartment or car keys. In addition, quite often the lid from it is lost.
It is this attitude towards the device that leads to its contamination. Small debris and dust getting into the card connector can damage it. This occurs because the pins become dirty and no longer interact properly with the port pins on the PC.
Also a sign that the flash drive is dirty can be its freezing, slow file transfer and reading of information. To clean the media connector you need a match or a cotton swab. Use a match to shake out all the debris from the connector. Soak a cotton swab in alcohol and wipe everything inside. This will help eliminate debris and prevent contact oxidation.
Viruses on PC or storage media
You should be especially careful to ensure that no virus gets onto the flash drive. Even on a trusted site you can get infected. And many users do not think about information security at all and download files from unverified sources.
Inserting a flash drive into someone else's computer that has viruses is a sure sign of infecting files that were already on the drive. Viruses on a computer multiply quite quickly, infecting more and more files.
This is why quite often a flash drive does not work precisely because it is infected with a virus. As a rule, in this case, the computer recognizes the media and beeps when it is connected. But the files on it cannot be read, and the system tries to convince the user that the flash drive was not found.
If this happens, first of all you need to install an antivirus on your computer and scan it completely. And in order to be able to view files on the card, you need to gain access to them. But to do this, you need to delete the infected document from it. To do this, first of all you need to do the following:
- Open "Start";
- Find through the search bar “Show hidden folders”;
- Right-click on the item requested and go to “Show hidden files and folders”;
- Find the line “Hide system files” and uncheck it;
- Find the line “Show hidden files” and tick it;
- Click the “Apply” button;
- Click "OK".
After all these steps, you need to go to the “My Computer” folder and go to the problematic device, in this case the drive. In its folder you will see a file called “Autorun”. This file must be deleted, and then the flash drive must be scanned for viruses using any anti-virus software. This can be done by right-clicking on the drive folder and selecting “Scan for viruses”. Typically, this line will be marked with your antivirus icon.
Once the flash drive is completely safe for use, you can easily read information from it. But, for example, if there were no viruses on it or it still did not work after all the manipulations, then the problem may lie in the lack of drivers.
Outdated drivers or their failure
It also happens that the flash drive is not displayed by the computer due to the drivers being outdated or a system failure. A common cause of failure is a power surge or sudden shutdown of the system. Also, older computers may simply not work with cards larger than 32 GB. Both can be solved by simply updating the drivers.
To do this you need to go to “Device Manager”. You can get to it through the “My Computer” folder and simply find it by searching in the system. After the “Device Manager” folder is opened, you need to insert the problematic flash drive into the computer port and open the “USB Controllers” tab. In the tab we find the line called “Storage device”, select it and delete it through the right-click menu. This is to remove the driver from the system for the flash drive. After removal, you need to reconnect the flash drive. This will start automatic driver installation and the computer will see it as usual.
Of course, if the problem persists, then you need to try something else. For example, reinstalling all USB drivers may help. This can be done using the disk that came with the motherboard. If it is not there, then you can download a driver update program. There are many such programs on the Internet. They work identically. They scan your computer and display all drivers that have updates. Also, such programs themselves update them after agreement from the user.
It is worth noting that you should not doubt your actions due to the difference in USB formats. Drivers for ports 2.0 and 3.0 are installed in the same way. Moreover, the ports differ only in the speed of writing and reading information.
There are errors in the file system
Due to the fact that there is an error in the file system on the computer, it cannot see the drive. You can check this through Device Manager.
To do this, you need to insert the drive into the PC and go to the “Disk devices” tab in the manager. If the device is displayed, then the drive itself is working, but the system simply does not perceive it as necessary. The problem can be corrected by simply formatting the memory card. But this is a very delicate action. It will be described in detail in the next paragraph.
If the drive is not displayed in this tab, then the flash drive itself is faulty. Its contacts could come loose or the controller could burn out. When it comes to repairing equipment, experts are quite capable of resurrecting it. But such minor work will be unreasonably expensive; it will be cheaper to buy a new device.
Conflict between file systems
It happens that files on the media are not displayed by the computer due to a conflict between the file systems on the connected device and the PC. For example, this often happens when the file system on the computer is NTFS and the drive is FAT32. This occurs not only in Windows operating systems, but also in Apple products. So, for example, if a flash drive was formatted on a MacBook, it will not be readable on a PC with the Windows operating system.
So, it turns out that the only way out is to format the device. But before doing this, it would be wise to copy the files to a computer with a different operating system. The last PC on which the drive was used is perfect. After formatting, the flash drive will be completely empty.
To properly format the drive you need to follow the instructions:
- Open the “My Computer” folder;
- Right-click on the connected device and select “Properties”;
- In the window that appears, see what file system is used on the drive and remember. Close this window;
- Right-click on the folder of the connected device and select the “Format” function;
- In the window that appears, check the box that matches the file system of the drive. This will allow you to format it into the desired file system;
- Check the “Quick” attribute and click “Start”.
After some time, the PC will report that formatting the drive is complete. The flash drive is formatted correctly and should now work correctly.
IMPORTANT! Quick formatting is chosen not only for the reason that files will be deleted faster. If suddenly there was something important on the flash drive, only in this deletion option can these files be returned using a special program. If you do not use quick formatting, the files will be lost forever.
Unformatted flash drive
Quite often, when a completely new flash drive is inserted into the port, the PC warns that the device needs to be formatted before use. That is, until formatting occurs, there is no access to the device. If the flash drive is new and there is no information on it, then you can safely format it of any type. The problem will go away after this.
But if the flash drive is not new and has been used before, that is, it has the necessary files or not, then you can try connecting it to the port of another PC. Then again to the computer, which does not provide access to the files. This simple action helps resolve the problem.
If the problem does not go away, then it is better to copy the necessary files to another PC and format the flash drive. Step-by-step instructions for correct formatting were provided just above.
The flash drive has been assigned a busy letter or there are problems with the partition
As already mentioned, technology is imperfect and even a computer can make mistakes. Thus, the PC may incorrectly determine the type of connected device. But you can’t tell by looking at it, because the computer signals the connection and the flash drive is displayed. But it cannot be used for its intended purpose.
Also, the problem itself may be that the system did not assign a letter to the partition, or did so, but it is already occupied. For this reason, a conflict between addresses arises.
To fix this, you need to try assigning a letter to the partition. You need to do this manually according to the instructions:
- Press “Win+R” simultaneously to open the “Run” window;
- Enter the command diskmgmt.msc into the line of the window. It will redirect to the section we need for managing drives;
- In the connected device manager you need to find the flash drive. You can simply turn it off and on and see what appears;
- On the partition defined as a connected drive, you need to right-click and click on “Change letter”;
- In the window that appears, click sequentially “Change” - “Ok”;
After this, an additional dialog box will open in which you can select the letter you like for the drive. After making your selection, just click on “Ok” and the selected letter will correspond to the device section.
ADVICE! Before choosing a drive letter, you should look at those already occupied. Otherwise, the problem will remain if you unknowingly assign a busy letter to the device.
The power supply is faulty or the portal is over-current
Many users noted that the computer did not see the drive because the power supply was faulty. Its job is to consume and distribute energy. Like any device, it has a limit on power values. That is why the distribution across nodes is balanced.
For example, such a situation may arise after replacing one node. And the new element requires more energy than the others. Because of this, the balance in the distribution of energy is upset, and since the power supply cannot supply more energy to the replaced node, it simply does not reach other points.
Such an imbalance in energy distribution can literally cut off power to the PC's USB network. It is correct to calculate in advance the energy consumption of a particular component when replacing it. But if an important element was replaced without this calculation, then all that remains is to buy a more powerful power supply.
But if the unit has not been replaced, then most likely the power supply is faulty and incorrectly produces the potential for power. For example, after a breakdown, it began to produce less power than declared by the manufacturers. In this case, you should not even try to fix the problem, since the fate of the entire PC is at stake. It's better to replace the power supply.
There is another explanation for the fact that the PC does not see the flash drive. Look at your computer, what is connected to it? A computer mouse, a keyboard lamp, a smartphone on charge and maybe some other device? And all this overloads the USB ports. Simply connecting multiple devices already consumes the maximum current distributed to them. And there's an extra flash drive there. In order for the PC to start seeing the map, you need to disconnect a couple of devices and the problem will be solved.
What to do if your Windows XP PC does not recognize the flash drive
There are a large number of reasons why a memory card is not recognized by a PC running the Windows XP operating system. The problem may be either in the storage medium itself or in the operating system. But the computer hardware itself may also be to blame.
If the operating system is the reason why the computer does not see the connected device, then you need to make changes in the OS settings. This can be done using special utilities, but it is recommended to do everything yourself.
A faulty flash drive is not worth the money that can be spent on repairing it at a service center. The only thing worth doing is keeping this one and buying a new drive. You should choose a good quality flash drive with a casing made of durable material. This will help protect the new drive from mechanical damage.
As a rule, if the PC cannot detect the drive, the OS informs the user about this with the following messages:
- The drive is inserted into the computer port and when you try to read information from it, a message like “Insert disk drive” pops up.
- When you try to read information from the card, the OS reports that the drive must be formatted before use and does not allow you to read data without this. It turns out that it is not possible to view the files, since after formatting they will be deleted.
- After the user attempts to access files on a connected device, the OS reports that access to files on the drive is impossible.
- Immediately after connecting the device through the port, the OS freezes. It is noteworthy that when the drive is removed, everything returns to normal.
When solving the problem that the PC does not see or read files from the drive, it is necessary to solve it sequentially, strictly following the points:
- The first thing you should pay attention to when connecting a drive is the indicator on the card body. It is built in there in order to determine the performance of the device itself. If the LED blinks, but the flash drive is not read by the computer, this means that the problem is in the OS itself or the PC hardware.
- The flash drive looks fine, but still doesn't work? It is recommended to change the port. There is a possibility that the one in which the flash drive is inserted is malfunctioning. Quite often, when connecting a drive through an incorrectly working port, the computer freezes. This is easy to check, since there are other ports on the computer. If everything works as it should when you reconnect the device, then you need to either stop using the broken port or have it repaired at a service center. It is also recommended to check whether it is dirty. Dirt and dust can interfere with the connection of the contacts and cleaning usually eliminates the problem.
- When using hubs or extension cables to connect a USB device, it may not be recognized by the computer due to a malfunction of the additional equipment. It can be easily repaired with minimal knowledge. Upon inspection, you can easily notice contacts that have come loose and a soldering iron can easily fix this. You can also solve everything without personal intervention and simply take the hub for repair.
- There is a possibility that not enough current is supplied to the USB ports. This happens due to their overload with various devices. This can be easily checked by turning off all extraneous devices, leaving only the essentials, namely the keyboard and computer mouse. After this, you need to connect the drive and make sure that it works. If this is the case, then the power supply is too weak and needs to be replaced. But buying a cheaper hub for USB devices can help, since it has its own power source.
- If the previous steps did not help resolve the problem, then there is a possibility that the power supply does not have enough power or the USB port is out of date for your drive. In a word, old computers and laptops cannot read drives larger than 32 GB. Nothing can be done here. Either use a smaller drive, or replace the computer with a more modern model.
- Well, the last possibility of a faulty flash drive is that it is connected out of habit to the front port. It may be de-energized due to the fact that the port is not connected to the motherboard. Also, the ports may not be working due to lack of power. You can connect them to the motherboard yourself. Detailed instructions for connecting them are located in the section above.
Errors in Windows XP prevent you from seeing your drive
The device may not be detected due to errors in the operating system itself. For example, the OS may simply not have the necessary update software packages needed for the correct operation of devices connected via USB ports. It is also possible that only some devices can be read on a certain port.
You can solve this problem by updating the system to SP3 and making all the updates that are available. This does not require any special knowledge. A couple of clicks and the system will do everything automatically.
Updates can be downloaded either from Windows Update or from media (flash drive, disk). But first of all, you need to check which package is installed on the system. To do this you need to do the following:
- Right-click on “My Computer” and select “Properties”.
- In the window that opens, view the necessary information.
In order to install updates, you need to let the system search for and install them on its own. This can be done in the Windows Update panel. After the system gains control, it will independently find the necessary updates and ask the user for permission to install them. The installation can be done either selectively of all found ones, or as a whole package. It is recommended to perform a custom installation only if you have an idea of what the selected update does. If there is no such knowledge, then it is better to let the system install all the updates found.
After the system has installed all the necessary OS updates, it will ask you to restart the computer. This is necessary for the changes to take effect. It does not take a lot of time. After the reboot, you can safely connect the flash drive and get on with your business.
For those who want to install only some updates, you need to know which one does what. Here's the information you need to get started:
There is a conflict between drivers in Windows XP
It also happens that due to conflicting drivers, the computer cannot recognize the connected device. Thus, old drivers can cause errors in the system and prevent new ones from working correctly. The problem can be expressed as an error message popping up when a flash drive is inserted. The system does not see it and requires you to insert a disk to start working. Sometimes the OS freezes.
This happens because the drivers conflict. For example, a user has two drives. After he inserts drive No. 1 into the PC, the system automatically installs drivers for this type of device. After finishing working with this device, the user removes it and begins working with drive No. 2. As a rule, the second flash drive is working, but the system still reports an error. This happens because the OS uses the installed driver after using drive #1 to start the second one. But they are incompatible with each other.
Reinstalling drive drivers on Windows XP
Since the drivers are incompatible with each other, they need to be reinstalled. This can be done either automatically or independently.
Due to the fact that the system uses drivers from one device to another connected via a port, you must first remove all drivers for this type of drive. Then perform a clean installation.
Typically, if there is such a conflict, the OS displays a message stating that the inserted device cannot be recognized. Also, the system may completely freeze, making it impossible to perform work on the PC.
Removing drivers using the DRIVECLEANUP utility
The special DRIVECLEANUP utility will help you remove drivers simply and effectively. This utility is good because before uninstalling it searches for drivers in the system. After which they are deleted.
To start fixing the problem, you need to turn on the PC and disconnect all unnecessary devices from it, leaving only the keyboard and computer mouse. This will help avoid various conflict situations during the process.
Then you need to download the driver removal utility. It is advisable to do this through a trusted resource, or better yet, from the official website of the program. The program itself is compatible with all versions of the OS. When the utility is downloaded, you need to open it using administrator rights. This can be done by right-clicking on the program icon and selecting “Open as administrator.” Then the utility will do everything on its own.
- Place the utility file for updating drivers in a system folder called System.
- Open the command line and write the command drivecleanup.exe and execute it by pressing the Enter key.
- This command will launch the utility, and the command line will display information about all drivers on the PC.
This will also remove them.
Automatic installation
Since in the previous paragraph all drivers were removed from the computer, you need to reinstall them. This is necessary for normal operation of the system. Fortunately, they can be installed automatically. It's very easy to do.
The only thing you need is a flash drive. You just need to insert it into the USB port of your computer. After the PC recognizes the device, automatic installation of drivers for it will begin.
Quite often this will be evident from the pop-up dialog box. But in some systems, the process of automatically installing drivers for a new device occurs unnoticed by the user.
This process is short-lived. This can take a maximum of 2-3 minutes, no more. After installing the drivers, the device will start working correctly. This means that now the computer will not only recognize the card, but also read information from it.
Manual installation
You can also install the drivers yourself without using a flash card. To do this, you need to download drivers from the Internet. But in this case, a conflict with the system may arise. That is why it is recommended to install using another PC.
To do this, you need to take the flash drive that had problems and insert it into the computer where it is recognized. There is a small condition for manually installing drivers, namely that the version of the operating system on the PC where the flash drive is not recognized and the one from which the installation will be carried out must completely match.
Now you need to search through the system to find two files with paths: %SystemRoot%\INF\usbstor.inf and %SystemRoot%\SYSTEM32\drivers\usbstor.sys
In any convenient way, you need to move these files to a PC that does not recognize the flash drive. This can be done, for example, using another flash drive or sent via Kidney or via Contact. On a computer that has a problem recognizing the drive, the files need to be placed in a folder with the same path where they were located on the working PC. After moving them to the required folder, the system will ask the user to confirm the replacement of files. When everything is ready you need to restart the system. And you can safely use an already working flash drive, as the problem will be resolved.
Here we have discussed the most common reasons why a flash drive is not recognized by a computer. But as you might guess, there are many other reasons for its inoperability. This error may also be accompanied by other messages from the system.
"Insert disk" message
This message may appear when a disc is inserted. First of all, it is recommended to check how the flash drive is inserted and whether the device itself reacts (flashing LED). It happens that over time the flash drive bends, and in order for contact to occur, you need to insert it into the port slowly until a sound signal is heard.
This may also occur due to the overlap of drivers from the previous media. Because of their incompatibility, it turns out that the flash drive doesn’t seem to exist. To correct the situation, you need to remove all drivers and install (simply reconnect the flash drive after removing the drivers).
The system requires you to format the disk before use.
This may happen because the flash drive is new and has never been used. In this case, you can format it without consequences, since there are no files on it.
But this may indicate a system failure in the flash drive itself or its damage. The solution to this problem is described above, and the principle of correct disk formatting is also given there.
A message appears indicating that there is a data error
This message appears when:
- There are incompatible drivers on the computer. Solution: uninstall and reinstall drivers.
- A conflict has occurred in the file systems. Solution: format the flash drive in the desired system with preliminary saving of the data.
- There is a failure in the media itself.
The system hangs after connecting the device
This PC behavior may indicate that:
- The port through which the media was connected is faulty.
- Presence of incompatible drivers.
To eliminate one of the problems, you need to connect the flash drive through a different port. If everything works, then that's it. No, it's the drivers' fault.
The computer does not see the flash drive, but it signals the connection
When the media is connected, an indicator on it lights up, indicating that contact has been established. If in this case the computer does not see the flash drive, a faulty contact in the media itself, which is directly responsible for transmitting information, may be to blame.
Also, a conflict between drivers or an already occupied partition letter can also cause such a reaction.
Error 43 / Error 43
If the OS produces this error, then it is useless to even try to access the files on the media, since it automatically stops the process of reading information on the device. The following reasons may cause this error:
- Media failure. It is recommended to check its functionality on a third-party PC.
- Presence of incompatible drivers in the system.
- The equipment configuration has been updated. Solution6: Roll back the driver in the Manager.
Conclusion
The article described all types of the most common reasons why the computer does not see the flash drive, and also described ways to solve them. It is recommended that if there is such a problem, solve it sequentially, following the points of the article. This will help correct the situation only if the flash drive is not mechanically damaged irreversibly.
Hello! Removable storage devices such as USB flash drives and memory cards have been used by us for quite a long time in all kinds of mobile or stationary devices. At the same time, a couple of us are faced with a problem when we want to transfer the next batch of files to our drive and are surprised to discover that the computer does not see the flash drive. Such failures in the operation of a removable device can be hardware or software. Let me make a reservation right away that physical problems will not be considered in this article.
Hardware failures are not a rare occurrence, but most often they fail due to software failures. I will not go into detail, but will immediately move on to solving problems and talk about the points that I know. All the steps described below do not have to be performed in the same order - situations vary.
The flash drive is not detected by the computer.
It’s trivial, but still, if you connect the device through the front panel of the computer, then in this case you immediately need to make sure that the USB port located there is connected to the motherboard and it is in working condition. When connecting a removable drive to a computer, in order to eliminate the blame of intermediaries, I do not recommend using USB extension cables, and if possible, connect the device to the USB connector, which is located on the back panel of the computer.

Ports on the front panel quite often fail, and by connecting on the rear panel, you will be sure that the drive is paired directly with the motherboard. If the flash drive has an LED indication, but it does not light up, then with a high degree of probability we can say that the problems are related to the hardware, but this is not a fact.
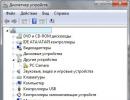
First of all, you should check whether the driver is installed correctly. Enter Device Manager using one of the following methods.
- “Start” - “Run” (Win + R), enter the command devmgmt.msc and press the “Enter” key.
- “Control Panel” - “Administration” - “Computer Management” - “Device Manager”.
Expand the USB Controllers tab. Actually, here we need to update the USB port driver. This list shows all the USB ports on your computer. If the flash drive is inserted into the port, then remove it and insert it again. As soon as you plug the flash drive into the port, look carefully at the list of controllers - it should be updated. Find the line that was added (or changed) to the list and right-click on it, and in the drop-down menu, find the “Delete” item and apply it.

This will remove the driver. To update it, just remove the USB drive from the port and insert it back there. Pay attention to the "Portable Devices" tab. The inserted device should show up here. Hover over it, right-click and open Properties. The status field should indicate that the device is working normally.
If you find somewhere in the “Device Manager” that some item is marked with a yellow exclamation mark, then you should also update the driver. Right-click on the item where the problem is marked and in the drop-down menu click “Update drivers...”. Then follow the steps suggested in the dialog box.
We determine the state and how the flash drive is mounted in the system.
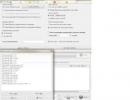
If everything is in order with the drivers, then to make sure that the computer sees the removable drive or not, you need to run the built-in Disk Management utility using one of the suggested methods.
- “Start” - “Run” (Win + R), enter the command diskmgmt.msc and press the “Enter” key.
- “Control Panel” - “Administration” - “Computer Management” - “Disk Management”.
After this, a window will open where you can analyze whether the computer sees the flash drive or not when you insert and remove the device from the USB connector. If the “Status” field displays “Good”, then right-click on the name of the flash drive in the “Volume” section, and in the drop-down menu activate the “Make partition active” item.

But if you see that the status is marked as “Unknown” or “Not initialized”, then 90% we can say that the USB flash drive is damaged. You can try flashing the controller. To do this, you will have to open the cover and see what type of controller it is, find the program and recovery instructions.
In some cases, you just need to assign a free letter so that the removable device is identified by the computer. To do this, in the same drop-down menu, select “Change drive letter or drive path...” This must be done due to the fact that the operating system cannot correctly connect a USB flash drive and, as a result, the informative icon does not appear in the “My Computer” panel.

If, when you connect a flash drive to your computer, you receive the message: “USB device is not recognized,” then try the following...
The connected USB device is not working properly.
When such a message appears, the first thing you need to do is connect the drive to another USB port. If the situation has not changed, then you should check the operation of the removable device on another computer. Operation was successfully completed? If yes, then this indicates that the driver is not working correctly. We have already considered one update option above, but this is a slightly different situation.
Usually in this case they recommend, but we will try to return everything to normal in one of the ways. Firstly, you can simply copy these files from another computer with the same version of the Windows operating system (must be the same on both machines):
%SystemRoot%\INF\usbstor.inf
%SystemRoot%\SYSTEM32\drivers\usbstor.sys
Extremely rare, but the files usb.inf, usb.pnf, usbport.inf, usbstor.pnf, usbport.pnf may also be required
Secondly, you can experiment and try to remove old drivers that interfere with the operation of the operating system and removable media. The DriveCleanup program will help you with this. What should be done:
- Turn off the computer and disconnect all devices connected via USB. You can leave the mouse and keyboard.
- Turn on your car and download the DriveCleanup program for your system version (32 bit or 64 bit).
- Run the program as administrator. To do this, right-click on the downloaded file and select “Run as Administrator” from the context menu.
After this, the process of removing old drivers will begin. When the removal is complete, you will see a report.

All that remains is to restart the computer and try to insert the USB flash drive into the computer again. If all of the above has been tried, then perhaps the case is trivial and the USB drive just needs to be formatted.
Formatting a flash drive.
The formatting process can be accomplished in several ways. For example, you can use the HP USB Disk Storage Format Tool or format it using system tools. It all depends on the severity. The program I mentioned quite often finds a flash drive, even if the computer itself is not able to do this.
Surprisingly, there are times when a flash drive is not detected due to different file systems. As a rule, Windows OS is installed with the NTFS file system, and the flash drive is initially FAT 32. With such a tandem, they should work great, but I don’t know why the problem sometimes occurs.
1. Go to the “My Computer” panel and find your flash drive in the “Devices with Removable Storage” tab and right-click on it. In the context menu, select “Format...”.

A dialog box will open where you must specify the NTFS file system and make sure that the capacity matches the size of the flash drive. Don't forget to activate the checkbox in "Quick (clean table of contents)". After you click the “Start” button, you will have to confirm your actions. After this, you will receive a message that formatting is complete. That's all, the removable drive is in NTFS format.
2. Sometimes, when you insert a removable drive into your computer, you may simply receive a message from the system: “Before using the disk in the drive, you need to format it.” At the same time, the device in the system may be identified as Generic Drive, and the system may display 0 bytes. In this case, the system itself will prompt you to perform formatting by displaying a dialog box.
The flash drive is infected with a virus.
Several times I have seen USB flash drives that are infected with a virus. Usually nothing happens when you connect a USB flash drive to your computer, but as soon as you try to open the device, you get this message:

Perhaps this flash drive was previously connected to an infected computer, and now the device is detected, but you cannot access it. Everything is resolved quite simply. Right-click on the removable drive and go to Explorer. Here you will see the autorun.inf file, which you need to delete in order to access the device.
Hello! Removable storage devices such as USB flash drives and memory cards have been used by us for quite a long time in all kinds of mobile or stationary devices. At the same time, a couple of us are faced with a problem when we want to transfer the next batch of files to our drive and are surprised to discover that the computer does not see the flash drive. Such failures in the operation of a removable device can be hardware or software. Let me make a reservation right away that physical problems will not be considered in this article.
Hardware failures are not a rare occurrence, but most often they fail due to software failures. I will not go into detail, but will immediately move on to solving problems and talk about the points that I know. All the steps described below do not have to be performed in the same order - situations vary.
The flash drive is not detected by the computer.
It’s trivial, but still, if you connect the device through the front panel of the computer, then in this case you immediately need to make sure that the USB port located there is connected to the motherboard and it is in working condition. When connecting a removable drive to a computer, in order to eliminate the blame of intermediaries, I do not recommend using USB extension cables, and if possible, connect the device to the USB connector, which is located on the back panel of the computer.
Ports on the front panel quite often fail, and by connecting on the rear panel, you will be sure that the drive is paired directly with the motherboard. If the flash drive has an LED indication, but it does not light up, then with a high degree of probability we can say that the problems are related to the hardware, but this is not a fact.
First of all, you should check whether the driver is installed correctly. Enter Device Manager using one of the following methods.
- “Start” - “Run” (Win + R), enter the command devmgmt.msc and press the “Enter” key.
- “Control Panel” - “Administration” - “Computer Management” - “Device Manager”.
Expand the USB Controllers tab. Actually, here we need to update the USB port driver. This list shows all the USB ports on your computer. If the flash drive is inserted into the port, then remove it and insert it again. As soon as you plug the flash drive into the port, look carefully at the list of controllers - it should be updated. Find the line that was added (or changed) to the list and right-click on it, and in the drop-down menu, find the “Delete” item and apply it.
This will remove the driver. To update it, just remove the USB drive from the port and insert it back there. Pay attention to the "Portable Devices" tab. The inserted device should show up here. Hover over it, right-click and open Properties. The status field should indicate that the device is working normally.
If you find somewhere in the “Device Manager” that some item is marked with a yellow exclamation mark, then you should also update the driver. Right-click on the item where the problem is marked and in the drop-down menu click “Update drivers...”. Then follow the steps suggested in the dialog box.
We determine the state and how the flash drive is mounted in the system.
If everything is in order with the drivers, then to make sure that the computer sees the removable drive or not, you need to run the built-in Disk Management utility using one of the suggested methods.
- “Start” - “Run” (Win + R), enter the command diskmgmt.msc and press the “Enter” key.
- “Control Panel” - “Administration” - “Computer Management” - “Disk Management”.
After this, a window will open where you can analyze whether the computer sees the flash drive or not when you insert and remove the device from the USB connector. If the “Status” field displays “Good”, then right-click on the name of the flash drive in the “Volume” section, and in the drop-down menu activate the “Make partition active” item.
But if you see that the status is marked as “Unknown” or “Not initialized”, then 90% we can say that the USB flash drive is damaged. You can try flashing the controller. To do this, you will have to open the cover and see what type of controller it is, find the program and recovery instructions.
In some cases, you just need to assign a free letter so that the removable device is identified by the computer. To do this, in the same drop-down menu, select “Change drive letter or drive path...” This must be done due to the fact that the operating system cannot correctly connect a USB flash drive and, as a result, the informative icon does not appear in the “My Computer” panel.
If, when you connect a flash drive to your computer, you receive the message: “USB device is not recognized,” then try the following...
The connected USB device is not working properly.
When such a message appears, the first thing you need to do is connect the drive to another USB port. If the situation has not changed, then you should check the operation of the removable device on another computer. Operation was successfully completed? If yes, then this indicates that the driver is not working correctly. We have already considered one update option above, but this is a slightly different situation.
Usually in this case they recommend, but we will try to return everything to normal in one of the ways. Firstly, you can simply copy these files from another computer with the same version of the Windows operating system (must be the same on both machines):
%SystemRoot%\INF\usbstor.inf
%SystemRoot%\SYSTEM32\drivers\usbstor.sys
Extremely rare, but the files usb.inf, usb.pnf, usbport.inf, usbstor.pnf, usbport.pnf may also be required
Secondly, you can experiment and try to remove old drivers that interfere with the operation of the operating system and removable media. The DriveCleanup program will help you with this. What should be done:
- Turn off the computer and disconnect all devices connected via USB. You can leave the mouse and keyboard.
- Turn on your car and download the DriveCleanup program for your system version (32 bit or 64 bit).
- Run the program as administrator. To do this, right-click on the downloaded file and select “Run as Administrator” from the context menu.
After this, the process of removing old drivers will begin. When the removal is complete, you will see a report.
All that remains is to restart the computer and try to insert the USB flash drive into the computer again. If all of the above has been tried, then perhaps the case is trivial and the USB drive just needs to be formatted.
Formatting a flash drive.
The formatting process can be accomplished in several ways. For example, you can use the HP USB Disk Storage Format Tool or format it using system tools. It all depends on the severity. The program I mentioned quite often finds a flash drive, even if the computer itself is not able to do this.
Surprisingly, there are times when a flash drive is not detected due to different file systems. As a rule, Windows OS is installed with the NTFS file system, and the flash drive is initially FAT 32. With such a tandem, they should work great, but I don’t know why the problem sometimes occurs.
1. Go to the “My Computer” panel and find your flash drive in the “Devices with Removable Storage” tab and right-click on it. In the context menu, select “Format...”.
A dialog box will open where you must specify the NTFS file system and make sure that the capacity matches the size of the flash drive. Don't forget to activate the checkbox in "Quick (clean table of contents)". After you click the “Start” button, you will have to confirm your actions. After this, you will receive a message that formatting is complete. That's all, the removable drive is in NTFS format.
2. Sometimes, when you insert a removable drive into your computer, you may simply receive a message from the system: “Before using the disk in the drive, you need to format it.” At the same time, the device in the system may be identified as Generic Drive, and the system may display 0 bytes. In this case, the system itself will prompt you to perform formatting by displaying a dialog box.
The flash drive is infected with a virus.
Several times I have seen USB flash drives that are infected with a virus. Usually nothing happens when you connect a USB flash drive to your computer, but as soon as you try to open the device, you get this message:
Perhaps this flash drive was previously connected to an infected computer, and now the device is detected, but you cannot access it. Everything is resolved quite simply. Right-click on the removable drive and go to Explorer. Here you will see the autorun.inf file, which you need to delete in order to access the device.
Your computer does not see the flash drive, what should I do? First of all, you need to find out whether this is due to hardware problems - a malfunction of the USB port or the drive itself. How to do it? When a working drive is connected to a working port, its indicator light should start blinking. This indicates that both the flash drive and the port are in perfect order, and the source of the problem is software in nature and is located in the operating system itself. Otherwise, the malfunction has a hardware cause. Let's look at the possible options in more detail.
Hardware reasons
- It often happens that the computer does not see the flash drive connected to the USB port located on the front panel of the system unit. The main reason for this malfunction is that these ports are simply not connected to the power supply or there is insufficient voltage supplied to them. To solve this problem, try connecting your drive to one of the ports located on the back of the system unit. Most likely, the flash drive can be easily identified.
- It happens that a USB device does not receive enough power due to overcurrent in the ports or hub, or due to a fault in the power supply. Owners of outdated laptops may also encounter this problem due to the large capacity of the USB drive. In such a situation, nothing can be done. Another reason is too many USB ports used at the same time. Disconnect devices that are not currently needed and try connecting your drive again.
- If after this the computer does not see the flash drive, then most likely the problem is not in the ports. Connect it to another PC, or better yet, to several. If the situation has not changed, the flash drive is definitely faulty. You can try to repair it by giving it to the appropriate specialist. Most often, this will cost more than the cost of the drive itself. Therefore, you need to resort to this option only if the information contained on the flash drive is important and you simply need to restore it. In other cases, it is easier and cheaper to purchase a new one.
Software reasons
If the USB device turns out to be working, then the problem lies in the operating system settings. For example, often the computer does not see the flash drive when support for USB ports is disabled in the BIOS. If this interface is enabled in the settings, then when you connect the drive you may see a message saying that “USB device is not recognized”, and the safe removal icon will change to an exclamation mark. What could be the reason for this, we will consider further.
- One of the most common problems is that when you connect a USB device, it is assigned a drive letter that is already present in the operating system, so the computer does not see the flash drive. Most often this happens when there are network drives. To fix this, you need to go to the “Control Panel” menu, then to the “Administration” section, then “Computer Management”. In the window that opens on the left, select the "Disk Management" line. A list of disks visible to the system will open on the right, among which should be your USB drive. Select it and go to the context menu, find "Change drive letter or drive path." Assign any free letter to the flash drive.
- Another reason could be outdated versions or lack of motherboard drivers at all. In order to determine its model, we recommend using the Everest program. Next, download the most current versions of drivers from the manufacturer’s official website. We do not recommend installing software from other sources - this can cause irreparable harm to your PC.
- It happens that everything is checked and in order, but the system does not see the required driver. To check this setting, you should use the "Device Manager", which can be accessed through the same "Control Panel". In the list that opens, pay attention to “USB Controllers”: if there is a yellow question mark next to at least one USB device, remove it and install the driver again. The last resort would be to remove all USB controller drivers. After a reboot, the operating system will automatically install them again. It is important to note that it is better not to use this method unless absolutely necessary.
- Sometimes the reason for the “invisibility” of a flash drive can be viruses. In this case, be sure to scan your PC for malware and get rid of infected files. If you can’t afford a paid antivirus program, it doesn’t matter. Now there are a large number of free applications, or you can temporarily use the trial version of a well-known antivirus.
- Also, do not discount the possibility of a conflict between the file systems of the USB drive and PC. The most common option is when the computer's file system is NTFS, and flash drives are FAT. In this case, just reformat it also to NTFS, this should help.