How to open the camera on Windows 10. Troubleshooting webcam problems on a laptop
Many users, after installing the latest version of Windows, began to notice some malfunctions in the operation of their programs or devices. This may include failure of web cameras. Most often this occurs after updating the operating system to the latest version, but it can also occur during a clean installation.
Usually, users try to eliminate the cause by reinstalling the driver to one suitable for the given system. But the fact is that most often it is already installed on the computer, but problems arise for completely different reasons.
Failure to work without updating
In the event of a sudden failure that is not associated with updating the operating system or reinstalling it, you can simply restore the drivers. To do this, go to the “device manager” and select your camera there by right-clicking on it. It will be located in the section with image processing devices.
After this, you need to select the “properties” line in the drop-down menu. Then the user will see a separate window, where on the “driver” tab, pay attention to the “roll back” button. If it is active, you must use this key.
Device rediscovery
This method helps in almost half of the cases, so it’s worth using it. To do this, you first need to go to the “device manager” and in the section for processed device images, select your camera and delete it from there. Also, if necessary, the drivers for it are also removed. If the camera is not found in this section, then this method will not work; it is better to use the next one.
So, after removing the device, you need to install it again. To do this, you do not need to exit the dispatcher; right in it, select the “action” item at the top, and in it “update equipment configuration”. Now the camera will be reinstalled, you just need to check its operation. This is done through a standard OS application located in the “start” called “camera”.
Of course, if it works here, but not in other programs, then the problem is not in the camera settings, but in the programs themselves. If everything is in order, you don’t have to use anything else, but otherwise, you need to read the next point.
Reinstalling the driver
Perhaps the camera really needs to update its settings, or maybe not at all, in which case a full installation will be required. To do this, again, there is a camera in the device manager and a drop-down menu is called up on it. Here you need to select the “update drivers” option.
The user will open a separate window where he should select to search for drivers on the computer, and then point to the list of already installed ones. It is better to select a driver that has not been used before, but if there is only one, install it or use device removal.
Camera not detected
If there is no camera in the “device manager”, then you need to use the “view” tab at the top and display hidden devices, perhaps it is there. Now on the camera icon that appears, you need to right-click and select “enable” from the menu for it to work. The camera may also be in the list of unknown devices; you should view that too.
If this problem occurs on a laptop, then first of all you should contact the official source for drivers. Some models may require not only a camera driver for correct operation, but also a whole set of them, which should be downloaded from the manufacturer’s website.
Using parameters
If the camera fails, it is possible that the drivers were installed incorrectly or were not suitable for the new operating system. Also, this device may use a certain program that began to fail after the update, so it should be replaced. This is done through the control panel, only now you should select the “programs and features” item. It will be visible when you change the panel view to “icons”.
In this list, you should find the software related to your webcam and then remove it. After this, the program must be installed again using the “parameters” menu. It is displayed in "start". In the required menu, select a list of devices and a list of connected ones. There you should find the camera and, by calling up the drop-down menu on it, select the “get application” item in it. After downloading everything should work.
Additional options
In addition to those listed, there are several more recovery methods.
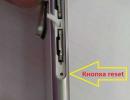
If the camera has never been used before or after reinstalling the operating system, and it does not appear in the device manager list, you should turn to the sources of the operating systems, or rather the BIOS, for help. But you should immediately note that this method is only relevant for built-in video communication devices. In the BIOS, select the Advanced or Integrated Peripherals tab and check whether camera activity can be enabled.
In the case of working with a laptop from the Lenovo campaign, everything is individual. That is, you need to download the special Lenovo Settings application to your device from an official source. If it is already installed, then go to the camera control section and find the privacy mode. If it is active, turn it off.
And one more option suitable for everyone. If the camera appears in the list of connected devices, but does not work, you need to pay attention to its drivers. Select a camera in the list and right-click on it to open the “properties” window. In it, in the “driver” section, click the “details” button, which displays a list of all files used to operate the device. In this list, you need to look for the presence of stream.sys, which indicates the “antiquity” of the drivers used. If this file exists, then the drivers should be replaced with newer ones, otherwise the camera will not work.
These are, perhaps, all the possible options for resolving the problem with the webcam.
Windows "Camera" One of the default applications in Windows 10. The application is not as functional as third-party applications, but it supports high-quality video recording and photography.
If the Camera app closes when you launch it or while shooting, it's not responding, and it can't record videos or take photos, you can easily fix the app by resetting it. Most common issues are resolved by resetting the Camera app.
If the problem persists even after resetting the Camera app, you can go ahead and reinstall the Camera app. Reinstalling applications in Windows 10 is not difficult. You just need to uninstall the Camera app and then install a new copy from the Windows Store.
In this guide, we'll look at how to reset and reinstall the Camera app on Windows 10.
IMPORTANT: If you are having problems with the camera on your PC, we recommend that you update the camera device driver or reinstall it before attempting to reset or reinstall the Camera app. If the built-in camera does not work, check that it is not disabled in Device Manager.
- Method 1 of 2
Reset the Camera app
To reinstall, refer to the instructions in Method 2 below.
Step 1. Open the application " Options» Go Applications → Applications and features.
Step 2: Find the Camera app and tap on it. You should now see a link " Extra options".

Step 4: Finally, click the button "Reset". A confirmation pop-up window will appear, click the button "Reset" again to do a hard reset of the Camera app.

Now you can launch the Camera app and check if it fixed your problem.
- Method 2 of 2
Reinstalling the Camera app using Windows PowerShell
Reinstall the Camera app if the problem persists even after resetting the app.
Unlike other default apps, the Camera app cannot be uninstalled using Windows Settings. We will use Windows PowerShell to uninstall the Camera app, and then install a new copy from the Windows Store. Here's how it's done.
Step 1. Run Windows PowerShell as an administrator. For this right click on button"Start" and select " Windows PowerShell ( administrator )» .

Step 2. In the PowerShell window, copy and paste the following command.
Press the Enter key to execute the command.

Step 3: Now find the application entry Microsoft.WindowsCamera.
Step 4: Copy the contents of a string PackageFullName, Use the hotkey Ctrl + C to copy the selected text to the clipboard.

Step 5: Run the following command to uninstall the Camera app.
Remove-AppxPackage PackageFullName
In the above command, replace PackageFullName to the contents of the PackageFullName line that you copied in the previous step.
In my case it is - Microsoft.WindowsCamera_2017.619.10.0_x64__8wekyb3d8bbwe

You can close the PowerShell window.
Step 6: Finally, open the Store app, search for the app Windows Camera and install it.

I hope you find this guide useful!
If you want to take photos using your laptop or tablet, then you need to download the Camera app for Windows 10. There are hundreds of programs to use the camera on your device. But they are all united by the fact that your device not only must have a camera, but also drivers must be installed. If there are no drivers, consider there is no camera. The camera can also be in a desktop computer, for example, an external webcam. But most often, owners of laptops and tablets want to download a camera application. These devices most often have a built-in camera.
Which camera app to download for Windows 10
There are hundreds of applications, we recommend choosing WebcamMax. This is a popular camera utility. Its advantage is that the utility can work both as an independent program and be integrated into other programs. For example, with this utility you can add effects to a video call or take pictures of your face with the built-in camera. WebcamMax is good for some other reasons:- Includes more than 1000 effects;
- WebcamMax is a free program in Russian;
- You can record a video;

You can download WebcamMax for free. Not all Camera programs are free. We do not know of a single free analogue that would at least partially duplicate the capabilities of this program. For example, have you ever come across an application that has over 1000 effects for pictures? You can just play around in front of the camera or change your appearance during a call. And if you use this program together with a voice changing utility, you can remain anonymous when calling through. WebcamMax is in Russian, so you won’t get confused with 1000+ effects, and you can also use the utility even in Windows Live.
Analogs of this camera program are inferior to it in literally everything. But if you do not have drivers for the camera, the application will not work and you will see a black screen or an error message. Therefore, download along with the camera program. This program will allow you to automatically install camera drivers. Which will make the camera work on any device, be it a laptop, tablet or computer running Windows 10 32/64 bit.
All owners of computers and laptops have a camera. Some have it built-in, others connect via USB. For modern life, this is a very convenient thing that allows you to conduct negotiations, webinars, make online calls and more. But it happens that the web camera may not work after Windows 10 has downloaded new updates, or after it has been completely reinstalled.
In the event of such a “breakdown”, users often look for new drivers for their PC in search engines, but usually they must be installed on the computer, and the reason for the camera not working is completely different. We will try to help you solve the problem in this article by describing several configuration methods.
Checking if the camera is turned on on the PC
Typically, Windows 10 automatically installs all the drivers for the device, so your webcam may not work for a completely trivial reason, maybe it is disabled.
You can check its activation using the Device Manager, which can be called by right-clicking on the Start menu.
You will see a whole list of different types of devices connected to your PC, but you are looking for the “Imaging devices” tab (usually it is located at the very bottom). Clicking on it will show you your camera.
By right-clicking on the line with the camera name and clicking on “Properties”, you can find out whether the function called “Enable”/“Enable” is active.
If you see that the camera is in shutdown mode, you need to turn it on, after which the system will prompt you to restart your computer. This should be the end of your troubles with the camera. If everything is in order and the web device is turned on, then the problem may be different.
Uninstall and update webcam drivers through Device Manager
In order to perform manipulations to remove a camera, you need to go to the already familiar “Task Manager”, find your camera and go to its properties. In the same window that contained the Engage/Enable button, there is a Delete button. You need to press it.
After the removal operation is successful, you need to install it again. To do this, we select from the provided "Device Manager" menu the function called "Action".
After that, click on “Update configuration”.
All drivers related to the camera should be back on the PC. Check if the camera is working now. If yes, then you do not need to follow further instructions.
Installing new drivers for the camera
Another option is to install drivers that are slightly different from what Windows installed on your PC. If your web device is shown in Device Manager, then you can follow the next option.
Right-click on the line with the web device and select “Update drivers”, and then select “Search for drivers”.
In the new window, click on “Select a driver from the list of already installed drivers.”
Among the options presented, you need to find a common driver for your video device. Click on it and install.
If you do not find cameras among the list in Imaging Devices, then you should look in Other Devices.
If there is an Unknown device, then you should try to install it. If nothing is displayed at this point, then you have a direct path to the official website of the developer of your PC. There you need to find information about the drivers for the web camera. Perhaps they are available, but they are not suitable for Windows 10, then you need to try installing them through compatibility mode.
You should also know that everything may be fine with the drivers and the camera is working correctly, but in programs such as Skype or similar, something may not function. Then the cause may not be problems in the camera program settings, but in the application itself. Then you need to change the settings in the program itself.
After installing and updating to Windows 10, users may encounter an issue where the camera on the laptop does not work. This problem may be due to either driver incompatibility or a malfunction of the hardware itself. To set up your camera, you should use the following tips.
If your camera doesn't work on your Windows 10 laptop and you don't know how to set it up, you should follow these steps:
- You need to check whether the drivers are compatible with Windows. To do this, you need to go to “Device Manager” and find the “Other devices” branch. In most cases, webcams are displayed here. To do this, right-click on the “Start” icon and select the desired element.
- Select the camera and double-click to open information about it. In the “Driver” tab, select “Update”. If this operation did not help solve the problem and the website of the laptop model developer has a driver specifically for Windows 10, click “Uninstall” and install the correct software.

- The official websites of laptop developers that have camera drivers are as follows:
| Manufacturer | Website |
| Asus | asus.com |
| Aser | acer.com |
| Dell | dell.com |
| HP | support.hp.com |
| Lenovo | support.lenovo.com |
| MSI | ru.msi.com |
| Samsung | samsung.com |
| Sony | sony.ru |
| Toshiba | support.toshiba.com |
- Here you need to select and download the required driver. If there is no driver for Windows 10, but there is one for Windows 1, download and install this driver. In most cases it is suitable.
- To install new software, do the following. Initially, click “Delete” driver. Then reboot the PC.

- After the reboot, go back to the “Device Manager”, open the camera branch and click “Update”. Select the option “Search for drivers on this computer”

- Specify the path to the driver. We wait for the installation to complete and reboot the laptop.
IMPORTANT! If the webcam in Windows 10 does not work, to check its functionality you need to use not only the standard application, but also third-party programs. It is possible that the application is causing the problem.
You can also try running the drivers in compatibility mode. To do this, right-click on the driver icon and select “Properties”. In the “Compatibility” tab, set the compatibility mode for Windows 10.

If these steps do not help solve the problem, right-click on the webcam driver and click “Fix compatibility problems.”


Click “Check program”.

If the driver is installed, reboot the laptop and check the camera for functionality.
It's also worth checking your network firewalls. Often, if the camera is used to send or view video, it is blocked by a firewall. It is worth adding the camera application to the defender exception.