How to install Windows from a flash drive step by step instructions. Installing the Windows operating system on a computer via a USB flash drive
You don't need to buy a disk and drive to install Windows 7, as you can install the operating system from a USB flash drive.
Inexperienced users are perplexed by the question of how to install Windows 7 from a flash drive. Not everyone knows how to install from a disk, and even fewer know how to install from USB. In fact, there is nothing complicated; it is important to strictly follow the installation instructions and not break the sequence of steps. Let's immediately decide that you need a USB Flash or an external hard drive with a capacity of at least 4 GB. The file system in which the media is formatted does not matter. In addition, you can even burn the image to an SD card or an external device, for example, an MP3 player, which is recognized as a flash drive on the computer.
Installation sequence
If you install the OS on a blank disk, then you don't need to worry about its contents. If you are reinstalling the OS, remember that the disk on which you are installing the system will be completely formatted, which means that all data on the disk will be deleted. Therefore, the very first step you need to think about is what files you need to save. Next, follow the following instructions:
- Download the OS;
- Create installation media;
- Changing BIOS settings;
- We start the computer from an external device;
- Follow the instructions for installing the OS;
- Install drivers and update the installed OS;
These 6 steps are similar for all versions of the operating system; the scheme also works for other versions of the OS, including Windows Vista or Windows 8.
Where to download OS
You need to download not just system files, you need an ISO image suitable for writing to a flash drive. You can download it here. Already at this stage you need to decide which version of the OS you need. The question is not only whether you will use the “Home” or “Professional” version, but also what bit capacity it will have - 32 or 64 bits. After you decide on the OS version, download it to your hard drive.
How to write an OS to a flash drive
If you simply burn the distribution kit to USB, then you will not be able to run the OS from it, nor can you run the installation from a flash drive. To create bootable media you need to use specialized software. One of the best programs for creating is . Let's look at creating this utility as an example. First of all, open our ISO image of Windows 7 inside UltraISO:

You need to choose not only the drive, but also the recording method. Select USB-HDD+, you don’t need to touch other settings.

How to start installation via BIOS
After you have created a flash drive with seven, you need to boot your computer from it. To do this, you need to reboot it and during system startup go into the BIOS and specify the startup sequence. Depending on the BIOS version, entry is available using the F2, Del, Esc keys, but there may be other keys. Inside the BIOS you need to find the BOOT tab, where you can specify the startup order. Your media must already be in the device, otherwise you will not be able to specify it to start when you start your PC. The loading sequence should be something like this:

After making changes to the BIOS, they must be saved and exited. Then the system will automatically reboot and start from USB.
Installation
After the start, the installation of the system itself will begin. If you downloaded the Russian version, then the entire installation will be accompanied by Russian instructions and recommendations. Just follow the instructions that appear on the screen, and within 20-30 minutes the operating system will be installed on your computer. If you have any questions, look at the instructions:
Don't forget that the hard drive where you install the OS will be formatted. This means that all data on the disk on which the new system is installed will be deleted. Therefore, you need to take care of their preservation in advance.
Setup and updates
After installing Windows 7 on your computer, it’s too early to relax. Next you have to configure the system, and then install all the necessary drivers. For settings and drivers you can use the following programs:
- DriverPack Solution;
The first program will optimize the operation of the system. The second program will automatically install all the necessary drivers. During setup, be sure to create a backup of the OS, as well as a first restore point, which will be useful to you in the future if you have any problems, for example, you encounter errors.
If you need to install Windows 7 from a flash drive via BIOS, then our article will be a great help for you.
Installing a new operating system on a computer is a fairly common problem that can arise due to the slightest malfunction of the system or the actions of an inept PC user.
This issue also became relevant in connection with the statement by official representatives of Windows about the suspension of technical support for the XP operating system.
Today, almost all users have completely switched to the so-called seven.
Our step-by-step instructions will help you quickly and easily bring your computer back to life.
Preparing the computer to reinstall Windows
Before you start working on new software, you need to properly prepare your PC.
First you need to remember what important information is stored on your computer and save it to a portable storage device.
Particular attention should be paid to the local drive C, as this is where the largest amount of information is saved.
Almost all users store their media files (photos, videos) in the “My Documents” folder or directly on the desktop.
These files are often located on the disk along with the already installed OS. You can also use the free space of another local drive to save information.
It is very important before reinstalling Windows to check whether there are drivers for the network card on the PC.
If you install a new system via USB, and then it turns out that the distribution does not contain drivers for the network card, then you will not be able to configure the drivers and Internet connection.
For your own confidence, it is better to once again make sure that the drivers are available.
Also, be sure to check if you have drivers for your sound card, audio card, video card, etc.
Preparing a flash card for software installation
To install an operating system from a flash drive, we recommend following these rules:
- The minimum size of the flash drive must be 4 GB. This is the amount of space required to save all important components and files;
- Mandatory preparation of a Windows 7 distribution kit for recording and saving its image (*iso format);
- Selecting a program to create a disk image.
We install and run the utility on the PC, and then select a pre-selected disk image from it.
Step-by-step instructions for using the program will help you quickly understand all the intricacies.
- Launch
2. Now the main working window opens in front of you

3. Let's move on to recording the hard disk image

4. Now you need to connect the flash memory and enable formatting. When the flash drive formatting process is completed, you can start recording.

5. After recording is complete, the space on your flash drive will contain Windows, with which you will perform the reinstallation.
Comment! To create a flash drive for installing the system via BIOS, you can use the toolsWindows.
Setting up Bios to work with a bootable USB flash drive
Just connecting the installation flash drive to the PC to install new software is not enough; preliminary configuration of the computer is required so that it starts booting from it when turned on.
All settings are made in Bios. Any laptop or computer has a BIOS, which stores important settings, including the order in which devices should boot.
It is this setting that we now need for further fruitful work.
To start the Bios, you need to hold or press a certain key on the keyboard when you turn on the computer.
You can find out which key we need from the information on the monitor. Typically these keys are Esc, Delete, F2.
If you have entered Bios, one of the following screens will appear in front of you:
Option #1:

Option #2:

If your login attempt fails, restart your computer again and try starting the BIOS again.
To make things easier for you, we have placed a table with the main options for enabling Bios.
Keyboard combinations for logging inBIOS depending on manufacturerBIOS

Basic key combinations for launchingBIOS depending on laptop and computer manufacturers

After you get into the Bios, you need to find the option that is responsible for loading devices. Usually it is in the menu and its name contains the word BOOT.
Other options are not excluded; you may even have to look.
Here are some examples:
Option #1:

Option #2:

Option #3:

Option #4:

Option #5:

As a rule, selecting the main device to boot is done by pressing the arrows on the keyboard, although sometimes there are other control methods.
If you can’t figure it out yourself, then refer to the help that appears in the BIOS.
In our case, the first boot device is a USB-HDD (there may be another name).
After selecting it, you need to exit the Bios and save all settings using the Save and Exit Setup item.
After this step, the computer should reboot and we will move on to the main stage for which we are here.
Installing Windows 7 using a bootable USB flash drive
If everything was correctly written to the flash drive space, and the correct settings were made in the BIOS, then you will see the following message on the monitor screen, which says that you should press any key to activate the boot.

If there is no such inscription, then you will have to check your actions. To do this, go to Bios and make sure that the boot from flash drive setting is saved.
If there are no errors in the Bios, then most likely you were unable to create a bootable USB flash drive and you need to repeat the whole process again.
If there is an inscription, then congratulations, your installation of the new Windows version via BIOS has begun.
Some installation images, in addition to the operating system itself, also contain various additional programs, then you will have to select the required item from the menu.
It is also worth saying that some disks perform most of the settings described below by default.
There is no need to worry about this, since all settings can be changed after the software installation process is completed.
A welcome screen appears in front of you, on which you select the necessary data. After the setup has been completed, click on the “Next” button, and then “Install”.

In a new window, the terms of the license agreement appear in front of us, which you, of course, read very carefully, and then agree by checking the special box and clicking the “Next” button.

The final stage of installation
In a new window you will have to select what type of installation we require. We need the full type.
To do this, select the required disk partition in the menu and click on the “Disk Setup” button, after which we start formatting.

At the end of the disk formatting process, move the cursor to the “Next” button and start installing the “seven” from the flash drive.

This process can last differently, from a few minutes to half an hour.
The main thing is that at the moment when the installation is completed and the system restarts, have time to turn on the Bios and change the settings through it. We need to configure the system to boot from the hard drive.
We have already described how this is done above. Here you just need to change from USB-HDD to the name of your disk.
This is a very easy action that should not cause you any difficulties.
Once the reboot is complete, Windows installation will continue.

- Enter names for the computer, laptop and users.
- Set a password, if necessary.
- Enter the name of the license key, if you have one (you can skip this step).
- Selecting security settings (“Recommended settings”).
- We set the date and time.
- We configure the network.
Thanks to these simple steps, you can install Windows 7 through the BIOS using a flash drive.
Installing Windows 7 from a USB flash drive
Step-by-step instructions: Installing Windows 7 from a flash drive via BIOS
It is best to learn how to install the OS yourself, and there are a number of reasons for this: savings, the ability to do it at any time and not depend on anyone, anonymity and security (no one but you will touch your computer), etc. In this article you will learn how to install Windows 7 from a flash drive on a computer and laptop.
Burning windows to a flash drive
In order to burn an ISO image of Windows 7 onto a flash drive, I use and recommend the rufus program to everyone. It is the simplest, free, quickly and correctly records any system. I have already written about all the advantages of the utility. It is so simple that you don’t have to follow the link and study it, but download it right away - https://yadi.sk/d/DUW30yh93RLmZq
Preparing for installation
The correct installation is considered if you format drive “C”. This is extremely necessary for the correct operation of the new system, and also, with the help of formatting, all viruses and useless and unnecessary files are removed. As you already understood, before starting the installation, you need to move all the information you need to another drive so that you can erase everything from the “C” drive. If you have only one partition and there is nowhere to move it, or save important information to a flash drive.
Installing Windows 7 OS
All manuals on the Internet have a BIOS setup step, but we will do without it. Why touch it again if there is a way to get by.
- After you have written Windows 7 to a USB flash drive and saved all the important information, insert the USB drive and restart your laptop/computer. When starting the PC, you need to call the BOOT menu to select a flash drive to boot, not a hard drive.
How to callBOOT menu:
Got it? Now, when you turn on the PC, call up the boot menu and select the flash drive with the system.
- If all of the above was done correctly, and after choosing to load the flash drive, you will see this window:

This means that everything is fine, and you need to press any button once.
- Select your native language and click “next”.

- A simple point where you need to click “install” and proceed to the next installation step.


It's best to set it to maximum.
- Check the box that you agree.

- Full installation or update. We need to click “full”.

- We select the HDD partition we need, i.e. drive “C” and click disk settings.

- Click “format”. (all information on it will be destroyed). We talked about this above.

- Confirm formatting and click next.

- The installation has started. Now it takes time (3-15 minutes) until the operating system is copied from the flash drive to your computer and installed.

12. Enter your name (nickname) and computer name and move on.

13. Set a password (if necessary), this is optional.

14. You must enter your product license key. Click next and we'll talk about it below.


16. Set the date and time. To prevent the clock from getting lost after each reboot, set your time zone.

17. Set up your Internet connection. If your computer is at home, select 1 item.

- All! Congratulations, you did it. Windows 7 has been successfully installed.
Installation completed. What's next?
Installing the operating system took you about 20 minutes, it would seem that’s all, but I have to disappoint you because... now you need to install everything else:
- Drivers. If you still have disks that came with your computer/laptop, use them. If not, I recommend downloading the “DriverPack Solution” program and it will select all the necessary drivers and install them.
- Download and install all the programs you need, including: browsers, flash player, directx, microsoft visual c++ and microsoft net framework.
- Customize your computer for yourself. Create the necessary shortcuts on the desktop, change their scale (size) by holding ctrl and scrolling the mouse wheel, configure the video card (if necessary), and everything else.
Also, more than likely, you installed an unlicensed Windows, and of course you do not have an activation key. It's not scary, and you can activate it in 2 minutes. I wrote how to do this.
How to install OS from USB: Video
Results of the work done
Most of what was written above was not necessary, but for proper installation it is recommended to do so. As a result, you received a fully working computer that works like new without spending your savings on it. Now you can reinstall the OS yourself and configure it in less than an hour (this time is equal to the time you would have spent transporting it to a service center).
Content
Almost all modern laptop computers (except Apple) use an operating system from Microsoft. Sometimes a situation arises in which it is necessary to reinstall the OS, so it would be useful to know how to reinstall Windows 7 on a laptop or netbook. You can use several options for launching the program.
How to reinstall Windows 7 on a laptop using built-in tools
A situation arises when there is a need to reinstall Windows 7, but there is neither a licensed DVD nor a flash drive on hand to which you can copy the system files. On all laptops, be it Acer, Asus or Lenovo, you can run a recovery or OS installation using a disk image. It can be created in advance or found on the Internet, but it must be stored on the computer, and the laptop itself must be turned on.
Reinstalling Windows 7 on a laptop requires special programs that can recognize images, these include:
- Diamond tools;
- UltraISO.
To do this, mount the image into this program and run the file with the .exe extension. If windows is simply archived, then there is no need to unpack it. Open the repository using winrar or winzip, again find the same executable file ending in .exe. After clicking on it, the standard process of reinstalling the operating system will begin.
How to reinstall Windows 7 from a flash drive or disk
In cases where the laptop cannot boot the OS on its own, you should use another computer to create the installation media. Before installing Windows on a laptop from a flash drive, you need to find an image and prepare the drive for writing files. If you have a licensed DVD, the process is much simpler, but there is an option that allows you to create it yourself.
Preliminary preparation of software for OS installation
To make bootable media from a DVD or flash drive, it is not enough to simply copy files or an image onto it. To do this, you should prepare the necessary version of Windows itself, using utilities to make an installation CD or flash drive. For the whole process you will need:
- The Windows 7 program itself.
- DVD or flash drive minimum 4 GB.
- ImgBurn utility or Windows 7 USB-DVD Download Tool.
Creating a bootable USB flash drive or disk
If you have a DVD-rom, reinstalling Windows 7 on your laptop can be done through it. You will need a Windows image and the ImgBurn utility, which can be easily found on the Internet. The creation process is as follows:
- Insert a blank DVD.
- Launch the ImgBurn program.
- In the window, select “Browse” and specify the path to the OS image.
- Do not set the maximum speed for recording; it is better to select the minimum.
- After recording, a window will appear, you need to click “Ok” and the finished disc will jump out of the device.

Many models of modern laptop computers and netbooks no longer use CD-ROM, so it is useful to be able to reinstall Windows 7 on a laptop using a USB flash drive. The process for creating installation media is as follows:
- Insert the drive.
- Launch the Windows 7 USB-DVD Download Tool.
- In the window, select the path to the system image file.
- Next, the program will prompt you to select from the menu what you need to create: DVD or USB Device. Choose the second one.
- Specify the path to the drive.
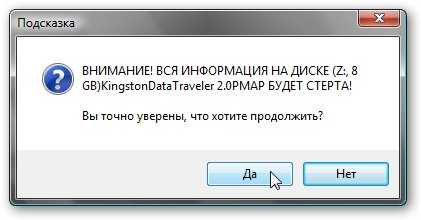
- The utility will warn you that all data from the media will be lost. Agree and the creation of the installation flash drive will start.
BIOS setup
To restore or reinstall Windows 7 on a laptop, you need to change some settings in the BIOS. First, restart your computer, and at the initial boot screen, press “del” (works for most models, but F8 sometimes works). The mouse does not work in this system, so all actions must be performed using the arrow keys on the keyboard. When going into BIOS, do the following:
- In the "Boot" section, find the "Boot Device Priority" section. This setting will indicate where to start the system from.
- In the menu, make sure that USB DEVICE is first in the list in order if you are using a flash drive or your CD-Rom if it is a disk.
- Press F10 and confirm that you want to save the changes.
Installing Windows 7
After all the steps described above, the installation will begin. The developers tried to make sure that the user does not experience any inconvenience and the whole process occurs as automatically as possible. The person will be offered several parameters that he must determine independently, but there are no difficulties with them. The entire installation, search for drivers for the motherboard, processor will be performed independently by the system, they are built into the OS and will be immediately installed with it on the hard drive. When reinstalling, the laptop must be connected to power.
Installing Windows 7 from a disk or removable drive has one algorithm. The user will need to follow these steps:
- Wait until the program copies all the necessary files. How long this will take depends on your PC configuration.
- Next, a license agreement will appear; you must confirm it.
- In the next window you will be offered the choice of restoring the system or performing a complete reinstallation. It is worth choosing the second option.
- At the next stage, you need to select a partition on which the OS will be installed. As a rule, select section C; all personal data from it will be deleted.
- Confirm your choice, and then the system reinstallation process will begin.
- During the reinstallation, the computer will reboot several times; after the first time, you will need to remove the bootable media and then reinsert it.
- At the end there will be several parameters that need to be set: time zone, if desired, set a password for the account, enter the license key.
- The utility will carry out all other actions independently.

If you are the owner of a compact netbook and sincerely believe that CDs and DVDs will soon take pride of place in the museum of storage media (next to cassettes and floppy disks), you definitely need to know the answer to the question “how to install Windows 7 from a flash drive? » And not only for this reason! There are more than enough motivations to study this computer wisdom.
An installation distribution on a USB drive is, at a minimum, convenient and compact. And most importantly, it’s reliable: you don’t need to worry that due to some scratch or speck of dust, a few bits will be lost and the OS installer will fail (again, as often happens with disks).
This article discusses in detail all the steps of installing Windows 7 from a flash drive: from selecting the media to setting up the distribution.
Preparing bootable USB media
The size of the installation flash drive must exceed 4GB. Since some assemblies of the “seven”, unlike the standard distribution, include many updates, patches, applets, integrated components (Framework, WinRAR, DirectX, etc.) Accordingly, they are larger in size.
1. Connect the flash drive to the PC.
2. Open the Start menu (the first icon on the taskbar).
3. On the right side of the menu, click Computer.
4. In the “Devices with removable media” section, click on the flash drive shortcut.
5. Select the “Format...” command in the context submenu.
6. In the formatting settings window, in the “File system:” option, set “NTFS”. Necessarily! Installing Windows 7 from a flash drive is most stable and correct on this system.
7. Click the "Start" button.
8. Wait until formatting is complete.
Selecting and downloading Windows 7 distribution
To create an installation flash drive, you will need a distribution image in ISO format. It can be downloaded from specialized websites or popular torrent trackers (nnm-club.me, torrent-windows.net, etc.)
Advice! Installing Windows from a flash drive is a responsible and extremely serious matter. The success of this event guarantees comfortable and safe work on the PC. Therefore, before downloading any ISO image of a system, or, simply put, an assembly, onto your computer, find out what other users think about it. Better yet, consult with IT specialists (if, of course, there is such an opportunity).
Creating a bootable USB flash drive
In addition to a formatted 6-8 GB flash drive and a Windows 7 distribution in ISO format, you will also need the UltraISO program to burn the USB installation media. And don’t be confused by the fact that this digital product is paid - you don’t need to buy it. The demo version of UltraISO is also suitable for making bootable media. Download it from the developer’s official website - ezbsystems.com/ultraiso/.
After downloading and installing the utility, do the following:
1. Launch UltraISO.
2. In the "File" menu, activate the "Open..." function.

3. Specify the path to the OS image:
- go to the section/folder where it is stored;
- select it with a mouse click;
- click the "Open" button.
4. Open “Boot” (third section of the UltraISO main menu) and click “Burn hard disk image...”.

5. In the settings window, in the “Recording method:” option, set the value to “USB-HDD+”, and then click the “Record” button.

6. When recording is complete, close the program. Make sure that the distribution package is installed on the flash drive (visually view its contents; do not edit or change anything!)
Installing Windows 7 from a USB flash drive
Before installing windows from a flash drive , transfer data that is valuable to you (photos, videos, game saves) from the system partition (drive C, on which the OS is installed) to a logical partition (to drive D or E). Otherwise, they will be destroyed during the installation process.
So, to install windows 7 from a flash drive:
1. Restart your PC and hold down the F8 key until the display shows Select boot device.

Attention! On your PC, this function can be activated by another key (for example F12, F2). Please check this specification in the manufacturer's data sheet.
2. Using the cursor keys, highlight the “USB” item in the menu (boot from a flash drive). Press the "ENTER" key.

4. In the “Windows Installation” window, click on the system partition (on which the OS will be installed). In its column, in the “Type” column, there should be the value “System”.
5. Check again that the settings are correct! And only then launch the “Format” function.
Upon completion of the installation - after the PC automatically reboots - you can begin installing the software.
That's all the instructions, dear reader! As a result of minor efforts, you have a self-made bootable USB flash drive and a “fresh” Windows 7 on your PC. What's bad?!