How to reinstall Windows: step-by-step instructions. How to reinstall Windows on a laptop - step-by-step instructions How to properly reinstall Windows 7 on a laptop
Hello! This is the first article on this blog and I decided to devote it to installing the operating system (hereinafter simply OS) Windows 7. The era of the seemingly unsinkable Windows XP OS is coming to an end (despite the fact that about 50% of users still use this OS), which means a new era is coming - the era of Windows 7.
And in this article I would like to dwell on the most important, in my opinion, points when installing and first configuring this OS on a computer.
And so... let's get started.
1. What should I do before installation?
Installing Windows 7 begins with the most important thing - checking the hard drive for the presence of important and necessary files. You need to copy them to a flash drive or external hard drive before installation. By the way, perhaps this applies to any OS in general, not just Windows 7.
1) First, check your computer for compliance system requirements this OS. Sometimes I see a strange picture when they want to install a new version of the OS on an old computer, and they ask why there are errors and the system behaves unstable.
By the way, the requirements are not so high: 1 GHz processor, 1-2 GB of RAM, and about 20 GB of hard drive space. In details - .
Any new computer on sale today meets these requirements.
2) Copy* all important information: documents, music, pictures on another medium. For example, you can use DVDs, flash drives, services (and similar ones), etc. By the way, today you can find on sale with a capacity of 1-2 TB. Why not an option? The price is more than affordable.
* By the way, if your hard drive is divided into several partitions, then the partition on which you will not install the OS will not be formatted and you can safely save all the files from the system drive on it.
3) And one last thing. Some users forget that many can be copied programs with their settings so that they can later work in the new OS. For example, after reinstalling the OS, many people lose all their torrents, sometimes hundreds of them!
To avoid this, use these tips. By the way, you can save the settings of many programs in this way (for example, when reinstalling, I additionally save the Firefox browser, and I don’t have to configure plugins and bookmarks again).
2. Where to get the installation disk
The first thing we need to get is, of course, a boot disk with this operating system. There are several ways to obtain it.
1) Purchase. You get a licensed copy, all kinds of updates, a minimum number of errors, etc.
2) Often such a disk comes with your computer or laptop. True, Windows, as a rule, presents a stripped-down version, but for the average user its functions will be more than enough.
3) You can make the disk yourself.
To do this, you need to buy a blank DVD-R or DVD-RW disc.
2.1. Burning a boot image to a Windows 7 disk
First you need to have such an image. The easiest way to do it is from a real disk (or download it online). In any case, we will assume that you already have it.
1) Launch the Alcohol 120% program (in general, this is not a panacea; there are a huge number of programs for recording images).
2) Select the option “burn CD/DVD from images”.
3) Specify the location of your image.
5) Click “start” and wait for the process to complete.
In general, in the end, the main thing is that when you insert the resulting disc into the CD-Rom, the system starts to boot.
Important! Sometimes, the CD-Rom boot feature is disabled in the BIOS. Next, we will look in more detail at how to enable booting into Bios from a boot disk (sorry for the tautology).
3. Setting up Bios to boot from CD-Rom
Each computer has its own type of bios installed, and it is unrealistic to consider each of them! But in almost all versions, the basic options are very similar. Therefore, the main thing is to understand the principle!
When the computer boots immediately press the Delete or F2 key (By the way, the button may differ, it depends on your BIOS version. But, as a rule, you can always recognize it if you pay attention to the boot menu, which appears in front of you for a few seconds when you turn on the computer).
And yet, it is advisable to press the button not just once, but several times until you see the Bios window. It should be in blue tones, sometimes green predominates.
If your BIOS does not look at all like what you see in the picture below, I recommend that you read the article about, as well as the article about.
Control here will be carried out using arrows and the Enter key.
You need to go to the Boot section and select Boot Device Priority (this is the boot priority).
Those. This means where to start booting the computer: for example, start booting from the hard drive right away, or check the CD-Rom first.
So you will add a point in which the first thing will be to check the CD for the presence of a boot disk in it, and only then move on to the HDD (hard drive).
After changing the Bios settings, be sure to exit it, saving the entered options (F10 - save and exit).
Note. In the screenshot above, the first thing to do is boot from a floppy (nowadays floppy disks are becoming less and less common). Next, it checks for the boot CD-Rom, and the third thing is to load data from the hard drive.
By the way, in everyday work, it is best to disable all downloads except the hard drive. This will allow your computer to run a little faster.
4. Installing Windows 7 - the process itself...
If you have ever installed Windows XP, or any other OS, then you can easily install 7. Here, almost everything is the same.
Insert the boot disk (we already recorded it a little earlier...) into the CD-Rom tray and restart the computer (laptop). After a while you will see (if you have configured the BIOS correctly) a black screen with the words... See the screenshot below.
Calmly wait until all the files are downloaded and you are prompted to enter installation parameters. Next, you should see the same window as in the picture below.
I think there is no point in including a screenshot with the OS installation agreement and acceptance of the agreement. In general, you proceed calmly to the step of marking the disk, reading everything along the way and agreeing...
You need to be careful in this step, especially if you have information on your hard drive (if it’s a new drive, you can do whatever you want with it).
You need to choose hard drive partition, where Windows 7 will be installed.
If there is nothing on your disk, it is advisable to divide it into two parts: one will contain the system, the second will contain data (music, films, etc.). It is best to allocate at least 30 GB for the system. However, here you decide for yourself...
If you have information on the disk- act extremely carefully (it is advisable to copy important information to other disks, flash drives, etc. before installation). Deleting a partition may make it impossible to recover data!
In any case, if you have two partitions (usually system drive C and local drive D), then you can install a new system on system drive C, where you previously had another OS.
After selecting the partition for installation, a menu will appear in front of you, which will show the installation status. Here you need to wait without touching or pressing anything.
On average, installation takes from 10-15 minutes to 30-40. After this time, the computer (laptop) may be rebooted several times.
Then, several windows will appear in front of you in which you will need to set the computer name, specify the time and time zone, and enter the key. You can simply skip some windows and configure everything later.
Selecting a network in Windows 7
Completing the installation of Windows 7. Start menu
This completes the installation. All you have to do is install the missing programs, configure applications and get on with your favorite games or work.
5. What do you need to install and configure after installing Windows?
Nothing... 😛
For most users, everything works right away, and they don’t even think that they need to additionally download, install, etc. There, I personally think that at least 2 things need to be done:
2) Create a flash drive.
3) Install drivers on the video card. Many people then, when they don’t do this, wonder why they start games or why some don’t start at all...
Interesting! In addition, I recommend that you read the article about after installing the OS.
PS
This completes the article about installing and configuring the seven. I tried to present the information in the most accessible way for readers with different levels of computer skills.
Most often, installation problems are of the following nature:
Many people are afraid of Bios like fire, although in fact, in most cases, everything is simply configured there;
Many people burn the disc from the image incorrectly, so the installation simply does not start.
If you have any questions or comments, I will answer... I always take criticism well.
Good luck to all! Alex...
Many laptops are sold with a pre-installed version of Windows 8, which, as practice has shown, does not suit a large number of users. In addition, Windows OS of any version sooner or later becomes clogged and also requires reinstallation. Also, reinstallation is often caused by various problems with computers, for example, if it does not turn on or if it is locked. Despite the fairly large number of steps involved in reinstalling Windows, even the most inexperienced user can install the OS using these instructions.
Preparing for reinstallation
The first thing you need to do is select the disk partition to install Windows. As a rule, a hard disk partition of at least 50 GB is allocated.
If your computer already has an operating system, you should save all the necessary documents in order to reinstall the OS without losing data.
To install the OS, you will need an 8 GB DVD or flash drive, on which a bootable installation will be created.
Selecting the OS version
The most common and stable version of the OS from Microsoft is Windows 7, in some cases it is reinstalled on Windows XP. The most decisive factor in choosing Windows is the availability of the necessary drivers. To check for which OS version your laptop has drivers, you need to go to the developer’s official website and look in the support section.
Most modern laptops have drivers only for Windows 88.1, some of them are also suitable for Windows 7, unfortunately, the correct operation of all devices cannot be guaranteed. For correct operation, it is recommended to install exactly the system for which the manufacturer provided drivers.
If your laptop has more than 4 GB of RAM, you should choose the system bit size - 32 (x86) or 64 (x64). To use more than 4 GB of RAM, it is recommended to select Windowsx64.
After selecting the Windows version, you need to download it. It is advisable to download an image as close as possible to the licensed version without adding additional software. This version of Windows will be more stable and will not cause additional problems during installation of the operating system. The most common option is the Windows 7 Maximum license.
Video: How to install Windows 7
Creating a boot disk or flash drive
You must upload the image in ISO format; most options are provided in this extension due to the ease of use when creating a bootable flash drive or disk.
To create, you will need the Windows 7 USB/DVD Download Tool, which can also be downloaded from the Microsoft website.
Install the program and proceed to the main steps:
- run the program;
- Click “Browse” and specify the location of the Windows installation image in ISO format. Clicks “Next”;
- in the next menu you need to select the type of media on which the Windows installation will be recorded - USB or DVD. If the drive does not work or is missing, then there is only one option left - a USB drive;
- Next, you should select the disk on which the recording will be made. After selection, you must click “Begin Copying”;
- For a flash device, the program will ask for confirmation of formatting, for which you need to click “Erase;
- The program will display a corresponding message about successful recording.
How to completely reinstall Windows 7 on a laptop
After creating the disk or flash drive, you can reboot the computer. Do not forget that all data on the disk on which you will install Windows will be deleted. You should also take care of your Internet connection settings; you can contact your provider or record the data yourself.
To begin installation, you must restart your computer and set your device to boot from the Windows installation files.
Setting up BIOS for installation
When reinstalling the operating system from a flash drive, you must set the boot priority from a specific device, in this case, a flash drive or DVD drive. This operation is performed for installation on a computer both without an operating system and with it. Fortunately, most modern laptops have a feature to quickly select a device to boot from. To call this menu when booting the laptop, a specific key is used.
Using this table you can select a button for your device:
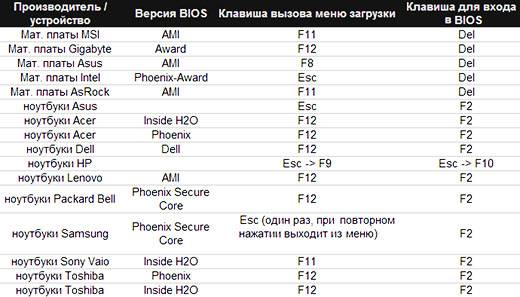
By clicking the button, the computer will present a window for selecting the device from which it will boot first. In our case, we choose a DVD drive or a USB drive.
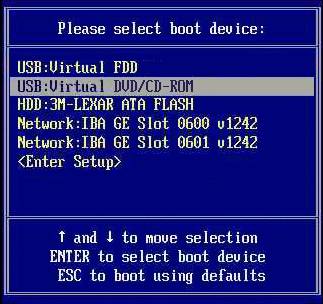
There is a more complex installation option via BIOS on an empty laptop or with an installed OS. To do this, when starting the devices, go to the BIOS (the button is indicated in the table provided). BIOS from different manufacturers has some differences, so the location of the settings may differ from those shown.
In the BIOS, go to the “Boot” or “Advanced BIOS Features” section and set the First Boot Device parameter to your device – a USB drive or DVD drive. To save the settings, press F10 and select “Save and Exit”. Thus, installation is performed from Dos via a USB flash drive or via BIOS from a disk.

Reinstallation process
After completing all the settings in the BIOS, you can proceed to installing the OS. If all actions are performed correctly after booting, the system will display the message “Press any key to boot from...”. To continue, press any key and wait for it to load.
In this case, we will look at installing Windows 7; other versions have minor differences, but the principle of operation remains the same:

- in the first Windows installation menu, you must select a language, then click “Next”;
- in the next section, click the “Install” button;
- if the downloaded image includes several OS configurations, for example, “home basic” or “maximum”, then the installer will offer to choose one of the options;
- in the next menu you must confirm your agreement with all items.
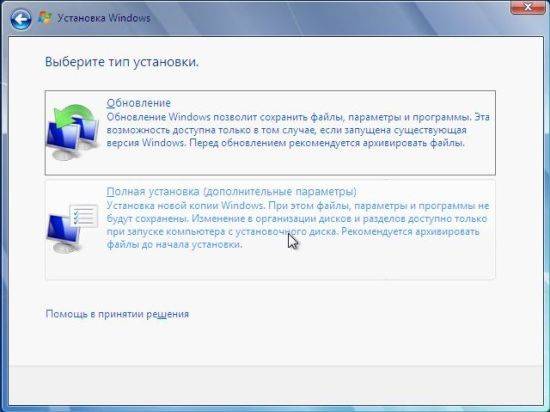
Selecting the installation type
- the program has the ability to update Windows, in which all files will be saved in a separate folder. Despite this convenience, it is recommended to select the “Full installation” mode. This option provides installation of the most stable and “clean” operating system;
Formatting a partition
- After selecting the installation, the program will prompt you to select the disk partition in which Windows will be installed. In this menu, you can format or distribute space between your hard drive partitions by opening a set of additional “Disk Settings” options.
Unfortunately, these operations will delete all information from the disk. This function allows you to create disks of the required size, for example, if your laptop was purchased without an axis, its hard drive is not “broken.” Don't forget to format all empty disks after performing operations on hard disk partitions. After completing all the steps, select the disk and click “Next”.

- after copying, the system will prompt you to enter the user name, computer name, and password;
- as security settings to ensure computer protection, you should select “Recommended settings”;
- after selection, set the time, date and select “Home Network” in the Internet connection menu.
Attention! When you restart your computer, you should remove the disk or flash drive to avoid reinstalling Windows.
At this stage, the Windows installation can be considered complete. Now you can install drivers, as well as various software and utilities. If you have changed the computer startup settings in the BIOS, we recommend that you set it to start from the hard drive first.
Reinstallation nuances if there is another OS
How to install Windows 7 on a laptop after Windows 8? Reinstalling an OS with Windows 8 does not make any difference if there is another OS from Microsoft on the hard drive. The only recommendation is to install the new operating system on the same partition in which the current OS is located.
Video: Why Windows won't install
How to reinstall Windows 7 with problems? If your Windows does not start, you will need to use another computer to create a disk or flash device. Since the installation is performed without starting Windows, problems with the previous OS will not interfere with the installation.
This article describes in detail the process of how to reinstall Windows 7 on a laptop without a disk by formatting your hard drive partition. Thanks to a detailed description, even users with little experience will understand the principles of installing Windows 7 instead of 8. Reinstalling a new operating system allows you not only to get the desired OS version, but also to get rid of a large amount of software that is reinstalled by the laptop manufacturer.
>When using a computer for a long time, any user sooner or later becomes puzzled by the fact that the system is cluttered, residual files do not want to be deleted voluntarily, and the laptop boots up at the speed of a wounded snail. Also, some viruses, although treatable at first glance, still leave their tiny traces. Subsequently, it grows exponentially and affects the entire system completely. Therefore, the user begins to ask the pressing question: “How to reinstall Windows 7?”
Of course, to solve these problems, you can use the services of plugins or start using a new antivirus, but such a solution will be temporary, and in a few weeks the situation will not only repeat itself, but will also worsen. In addition, sometimes the computer simply leaves no choice, threateningly greeting you with a “blue screen of death” with farewell instructions.
Reinstalling the operating system in a specialized salon costs a lot, so today we will save a couple of thousand and learn how to reinstall the OS ourselves. But before you reinstall Windows 7, there are a few steps you should take.
Preparing and saving data
How to properly reinstall Windows 7? In order to protect yourself from losing important files after reinstalling the system, it is worth spending a little time and saving on a flash drive or disk those documents that you may need in the future.
For example, not everyone wants to lose their achieved results in their favorite game. You just need to find and save one small file, which is located in the AppData folder of the user. If a folder with this name is not displayed, you need to go to “Computer” - “Local Disk” - “Users” - “your name” and there click on “Arrange”, then select folder and search options in the drop-down menu.
And put the checkbox on “Show hidden folders and files”.

How to save favorites and links from the browser
- For the Mozilla Firefox browser, you will need to go to “Local Disk” - “Users” - “Username” - “Favorites” and save the entire folder.
- To save Google Chrome data, go to “Local Disk” - “Users” - “User Name” - “AppData” - “Local” - “Google” - “Chrome” and save the User Data folder.
- For Internet Explorer, it is enough to save the “Favorites” folder located in “Local Disk” - “Users” - “User Name”.
- When working with Opera, we go to the well-known path to the AppData folder and then Opera, you only need to save the bookmarks.adr file.
Saving torrent files
To save torrent files, go to AppData, find the uTorrent folder there and copy it completely. After reinstalling the system, the saved folder must be placed in the same location. This also applies to saved games and bookmarks in browsers.
When all the necessary data, photographs and other necessities have been successfully saved, we begin reinstalling the OS to the beat of the drums.
How to properly reinstall Windows 7
If you have a disk with an operating system, then insert it into the drive, after which the automatic reinstallation of the OS should begin, although in 60% of cases this does not happen. What to do in such a situation to understand how to reinstall Windows 7? “BIOS” is a mystical word, upon hearing which many begin to get nervous. In fact, there is nothing wrong with the BIOS if you don’t touch anything unnecessary (and even in this case, all parameters can be restored). In order to get to your destination, you need:
- restart the computer;
- Press the del key 2-3 times until the Windows splash screen appears. If the transition to the BIOS does not occur, simply repeat the procedure again.
So, if everything is done correctly, the following image should appear before your eyes:

Next, find First Boot Device and set the value to CD-ROM. This means that when your computer starts, it will automatically load data from the disk first. After installing the software, it is very important not to forget to return everything as it was, or the computer will continue to install the system forever (if you also forgot to remove the disk).

Press f10 to save changes. If all conditions have been met, the system will begin reinstalling.
The next window prompts us to select the language, date and set the time. We set some simple parameters, and feel free to click “next”, “install” and accept the license agreement.
type of instalation
- Upgrade - suitable only if the system is reinstalled for minor reasons. If the decision was made in connection with the “screen of death” or if malware is clearly installed on the computer, we definitely choose a full installation.
- Full installation (custom) - reinstalls the OS literally from scratch, mercilessly destroying everything that can harm it.

Disk configuration
Here you have to choose which disk will appear as local, i.e. the one on which the software will be installed.

Logically speaking, the volume of the system disk should be within 35 GB, but not less. It’s worth considering that many of us like to save files using the “throw it on the desktop for now so as not to forget” principle. All documents, pictures, etc. that are located on the desktop are stored on the system drive, as well as files from the “Downloads” folder. Thus, when calculating local disk space, it is worth being more generous.
Click “Next” and go have a snack, we have at least 45 minutes. During installation, the computer will reboot several times, which will kindly warn you. You shouldn’t interfere with this; if no unforeseen situations occur during the process, in 45-50 minutes the new Windows 7 will be installed safely.
The next step is the username and computer name. If at some point you need to change these settings, this can be done simply: “Start” - right-click on “Computer” - “Properties”. Find “Computer name, domain name and workgroup settings” and click “Change settings”.
It is not necessary to set a password, so you can skip this step by clicking “Next”.
You will also need to enter your product key. You can find it on the bottom of the laptop or on a special sticker on the system unit (if you purchased the equipment along with a licensed disk).
If the software was installed from another disk, then the key should be indicated on the box. Well, if the system was installed illegally, you can skip this point and forget about this issue for about a month. After 30 days, the beautiful picture on your desktop will be replaced by a black screen, and some functions and devices may be disabled. If this doesn’t bother you, then you can safely work with the system further or be puzzled by searching for a suitable key on the Internet.
When choosing the type of update installation, it is best to use the recommended settings. If the system is not automatically updated, then sooner or later minor problems may arise in working with the most frequently used programs. The update eliminates minor bugs and optimizes the operation of the OS.
How to reinstall Windows 7 without a disk or from a flash drive
Sometimes it happens that there is no disk with Windows, or the CD-ROM is blind and categorically refuses to cooperate. Don't despair, there are no hopeless situations. There are several ways to install the system using other media. For example, you can reinstall Windows 7 from a flash drive.
Reinstalling the system using a flash drive
First, download the OS image to your computer. After this, install the Ultra Iso program or you can use Daemon Tools, the algorithm is approximately the same.

Next, take a flash drive or memory card, but it’s worth noting right away that the BIOS will not see any of the drives installed via the USB-3 connector, so be careful and use USB-2. Externally, the connectors do not differ; in some devices, USB-3 is marked in blue. If there is no identification mark, then everything is simple. We find in any search engine information about the characteristics of a laptop or computer, and then - information about which side the connectors we need are installed on.
In order to prepare a flash drive for further work, it must be formatted, even if there is nothing on it. Next we perform the following steps:
- In UltraIso, open the Windows 7 image that we have already downloaded (“File” - “Open” - select the program image).
- Find “Self-upload” in the top menu and select “Burn hard disk image.”
- In the window that opens, indicate the formatted flash drive.
- We confirm the check, and set the recording method to USB-HDD+.
- Click “Record”.
- We agree with the fact that all files will be erased from the flash drive (even though we formatted it, we still set it to “Yes”).
- Voila! If we see “Recording complete,” then the job is done and you can start reinstalling.
- We go to the BIOS in the known way described above, and in First Boot Device we select the recorded flash drive.
Reinstalling Windows 7 using an image recorded on a DVD disc
Another method will tell you how to reinstall Windows 7 via CD-ROM without a license disc.
Why DVD? Everything is elementary, a regular CD will not work for one simple reason - there is not enough space, and the OS image “weighs” about 3 GB.
If for these purposes you decide to use a DVD that already has something on it, then, as in the situation with a flash drive, you need to resort to formatting.
Now open the already well-known UltraIso program, go to “File” - “Open” and find the downloaded Windows image.
Next, go to the “Tools” menu and click “Burn CD image”, in the window that appears, check the “Check” box, humbly accept the fact that everything on the disk will be destroyed and click “Burn”.
That's all, after the message “Recording complete” appears, our disk is ready. We think everyone has already guessed what to do next. That's right: go to the BIOS and select the recorded disk as First Boot Device.
How to go back from Windows 7 to XP
Sometimes it is difficult for users to master a new system, so for some it is easier to reinstall Windows 7 on XP. The installation procedure is not much different from that described earlier, with the exception of a few points:
- After proceeding to the installation, the system prompts you to select which partition (that is, which disk) the OS will be installed on. In order to completely destroy a previously installed Windows 7, you need to select the appropriate partition. After this, there will be 4 formatting options to choose from, the only correct one of which is “Format partition in NTFS system”. After this, the computer usually restarts and begins installing the system.
- If there is a strong desire to install two operating systems on one computer or laptop at once, then, on the contrary, select the partition that is not occupied by system files. This is usually drive D.
Reinstalling Windows 8 to 7
Despite the fact that the majority of users positively assessed the seventh version of the software from Microsoft, the “eight” received rather contradictory responses. Since the newest version is fundamentally different from all previous ones, sometimes there is a desire to replace the OS.
In order to reinstall Windows 8 to 7, you will need to go into the BIOS and set the primary priority to the CD-ROM (how to do this was described earlier).

After that, save the changes and proceed to boot from disk or other media. The installation type when changing Windows 8 to 7 can only be “New installation”, since the OS is different, there is no need to talk about any updates.
It is also necessary to delete all partitions, including hidden ones. After that, without thinking any more about how to reinstall a Windows 7 computer, we do the rest:
- indicate the time, date and keyboard layout;
- agree to the terms, indicate the user name and computer name;
- enter the key, etc.
After installation (drivers)
As a rule, reinstalling Windows 7 on a laptop or computer is quite easy, but after the process of replacing the OS, many users have a number of questions. For example:
- “Why did the image quality deteriorate after installing the new system?”
- “Why doesn’t my computer or laptop see the flash drive?”
- “Why has the sound gotten worse?” etc.
All this happens most often when the reinstallation was carried out by downloading the OS or purchasing a disc from someone else (you don’t have to think about how to reinstall a Windows 7 computer, but some “jambs” still pop up). In order to solve a number of similar problems, it is enough to download drivers from the manufacturer’s official website. Or pay attention to the drivers before reinstalling the system.
Let's look at it with an example. Let's say that before reinstalling Asus Windows 7, the user was not puzzled by the issue of saving data from his laptop, or he simply did not have the opportunity to do this. What should I do?
It’s simple, just type in the search engine the model (the manufacturer’s company is enough) of the device and add the treasured phrase “Download drivers from the official website.” Then go to the link of the manufacturer’s website and indicate the full model of the laptop in the appropriate form. Next, you need to download all the presented drivers one by one and install them on the laptop one by one. There are no installation tricks, since the drivers install themselves where they should.
If for one reason or another the drivers have gone wild and are installed in the wrong place, you can go to the device manager and force them to update.
In order to get into the remote control, you can simply type “Device Manager” in the search bar that pops up when you click “Start”. Next, right-click on the driver that is marked with an exclamation mark. And select “Update drivers”, in the new window all that remains is to indicate that the required files must be searched on the computer itself and indicate the location where they were installed.
If all drivers are installed normally in the device manager, the image will improve and the screen resolution will increase to the required level.
Finally
The computer can “fly” at any moment, so it’s worth thinking about organizing backup storage for high-value files before reinstalling Windows 7. This way you can save a lot of time after installing the system, because it’s quite possible that even the most basic programs ( Word, etc.) will have to be searched and installed again.
Reinstalling Windows 7 on a laptop or computer is not difficult; even a novice user can cope with this task. The main thing is to approach the issue responsibly and spend an hour saving all useful information from the computer before reinstalling the OS.
Hello, dear site visitors website! Have you decided to reinstall Windows 7 on your laptop or computer? Our detailed instructions for reinstalling Windows 7 should come in handy. It is designed for any level of user, even for dummies. What is correct reinstallation of Windows 7?
Some people want to know how much it costs to reinstall Windows 7. You can do the reinstallation yourself for free using our instructions. To reinstall Windows 7 quickly and without consequences for important information, you need to prepare your data and hard drive for installing a new system. Let's do the entire Windows 7 reinstallation step by step together. Let's start with the old operating system that is installed on your laptop or computer now.
Preparing to reinstall Windows 7
 Our instructions are universal and suitable for laptops ASUS, Acer, Compaq, DELL, HP, Lenovo, MSI, Samsung, Sony, Toshiba, as well as other manufacturers and desktop computers. In the article about that, we already told you that before you start reinstalling any Windows operating system, you must first prepare. What does this mean, how to properly reinstall Windows 7?
Any complete reinstallation of Windows 7 on a laptop, netbook or computer should begin by saving important information to another separate medium. For example, on a flash drive or external hard drive. Surely you have important information that you need to save to avoid its loss.
Here you need to proceed from what OS is installed on the computer now. For example, if you want to reinstall XP on Windows 7, then you may need to look for your information in other places than in Windows 7. In any case, double check all possible logical drives, all folders. The most common places where most users store information are:
- Desktop.
- My Documents folder
- Drive "C:"
Of course, we cannot tell you about all the important places where information is stored on your laptop or computer;). But we advise you to double-check everything, since our goal is to reinstall Windows 7 on a clean, formatted logical drive. Why do we recommend reinstalling Windows 7 on clean media?
Firstly, many users acquired several viruses during the operation of the old system. Even if you don’t know about it, the likelihood that there is a file somewhere infected with a virus is quite high. By the way, many people decide to completely reinstall Windows 7, precisely because of viruses. This is a last resort, you can always try or try.
Secondly, installing Windows 7 on an unformatted logical drive will only add to problems in the future. After all, all the programs will remain on it, which will still have to be reinstalled, as well as the folder with the old Windows.
Selecting Windows 7 version
Before we begin to describe the installation of the new OS, a few words about the distribution of your Windows 7. This OS, like the previous Vista and subsequent generations, has two branches: 32-bit and 64-bit. The 32-bit version of the system does not allow the use of more than four gigabytes of RAM. This is due to the peculiarity of the architecture. How to reinstall licensed Windows 7? There are several versions of the operating system:
- Windows 7 Starter. This version of Windows 7 can hardly be called a full-fledged OS. Almost all functions in it are blocked by Microsoft. Windows Starter was installed on some laptops. The maximum possible amount of RAM that this 32-bit version of Windows can use is 2 gigabytes.
- Windows 7 Home Basic. It has a very limited set of functions. Also distributed as an OEM version with laptops. The maximum memory capacity is 8 gigabytes.
- Windows 7 Home Premium. Suitable for most users, allows you to use most of the necessary functions.
- Windows 7 Professional. Almost complete set of functions.
- Windows 7 Enterprise and Windows 7 Ultimate . Top versions, one of which is intended for business, and the other for home use. Everything is described in more detail in the table.
| Function / Edition | Initial\Starter | Home Basic | Home Extended \ Home Premium | Professional | Corporate\Enterprise | Maximum\Ultimate |
|---|---|---|---|---|---|---|
| Sale only under OEM licenses | Retail sales and OEM licenses (only in emerging markets and Russian) | Retail sales, OEM and corporate licenses | Sold only under corporate licenses | Retail sales and OEM licenses | ||
| End of support | 14.01.2020 | 14.01.2020 | 14.01.2020 | 14.01.2020 | 14.01.2020 | 14.01.2020 |
| Availability of 64-bit version | — | Template:Yes (only under OEM license) | + | + | + | + |
| Maximum RAM size for 64-bit versions | 2 GB (for 32-bit version) | 8 GB | 16 GB | 192 GB | 192 GB | 192 GB |
| Windows 7 Recovery Center | No domain support | No domain support | No domain support | + | + | + |
| Home Group feature (create and join a group) | Join only | Join only | + | + | + | + |
| Windows Aero interface | — | Basic theme only | + | + | + | + |
| Multiple monitor support | — | + | + | + | + | + |
| Quickly switch between users | — | + | + | + | + | + |
| Ability to change the desktop background | — | + | + | + | + | + |
| Desktop Manager | — | No WinFlip 3D support | + | + | + | + |
| Windows Mobility Center | — | + | + | + | + | + |
| Multitouch and improved handwriting recognition+ | — | — | + | + | + | + |
| Windows Media Center | — | — | + | + | + | + |
| Additional games | — | — | + | Disabled by default | Disabled by default | + |
| Windows XP Emulator | — | — | — | + | + | + |
| EFS (data encryption system) | — | — | — | + | + | + |
| Printing based on location information | — | — | — | + | + | + |
| Ability to act as a remote desktop host | — | — | — | + | + | + |
| Connecting to a domain | — | — | — | + | + | + |
| Possibility of downgrading to Vista or XP | — | — | — | + | + | + |
| Support for multiple physical processors | — | — | — | + | + | + |
| AppLocker | — | — | — | — | + | + |
| BitLocker and BitLocker To Go | — | — | — | — | + | + |
| Branch Cache | — | — | — | — | + | + |
| DirectAccess | — | — | — | — | + | + |
| Multilingual user environment+ | — | — | — | — | + | + |
| Booting from VHD (Microsoft Virtual PC image file) | — | — | — | — | + | + |
| Launching snap-ins | — | — | — | + | + | + |
We also do not recommend using non-original assemblies, of which there are plenty on the Internet. This is especially true for laptop owners. The fact is that such assemblies may contain errors, disabled Windows 7 services, and simply surprises in the form of malware. Now, seven is not so expensive, and you can buy Windows 7 by becoming a license holder.
Reinstalling Windows 7 from a USB flash drive
To reinstall Windows 7 from a flash drive, you need to have on hand one of the versions presented in the table above (the main thing is not Starter :)). DVD drives are not widely used today. Instead, they were replaced by flash drives. Reinstalling Windows 7 from a flash drive, without a disk, is more convenient. You can always take a USB flash drive with you without worrying whether your computer has a DVD drive or not. In addition, not all laptops are equipped with drives.
To make a bootable USB flash drive with Windows 7, just burn an ISO image of your new system with a special program. We described the process of creating a flash drive with Win 7 in detail in the article ““. The Windows 7 reinstallation program listed in the article should help. We hope there will be no difficulties.
After you burn the image to a flash drive and save important data, you can begin reinstalling Windows 7. Reinstalling Windows 7 via BIOS is not as complicated a procedure as it might seem at first glance. To do this, you need to reboot and then . Next, exit the BIOS, saving the settings. The computer will select the drive and begin installing Windows 7.
How to reinstall Windows 7
Let's proceed with the step-by-step reinstallation and find out how to reinstall the Windows 7 system. After downloading the installer, we find ourselves in the step-by-step installation system. In the first step, select the language, time format and keyboard settings, here you can leave everything as default and click the “Next” button.

At the next stage, we begin installing Windows 7 by clicking the coveted button.

Select the version of Windows 7 for which you have a license key.

We accept the license agreement by checking the box and moving on to the next step.

At this stage, you need to select the “Full installation” option, since, as we said earlier, it is better to install Windows 7 from scratch.

Next, we get to the important stage of installing Windows 7. Here you need to select the partition on which the new operating system will be installed. Remember we asked you to save all important information? It's time to format the logical drive with old Windows. To do this, let's move on to the next installation stage.

Select the desired hard drive partition and click on “Format”. This is reinstalling Windows 7 with formatting the logical drive.

If you have saved all important data, feel free to agree. If not, then there is still an opportunity to do this by restarting the computer and specifying the hard drive in the BIOS.

Our disk for almost reinstalled Windows 7 has been created. Those who need to increase or decrease its volume can use the “Expand” button.


After a short installation, the installer will ask you to enter your name or nickname, as well as name your laptop or computer.

At the next stage of reinstallation, you need to enter a password. You don’t have to do this if only you use the laptop or computer, and a stranger cannot access it.

The long-awaited entry of the serial number of a licensed copy of Windows 7. Do you have it? 😉

In the next reinstallation step, you will be prompted to install built-in Windows protection. This is, of course, not a full-fledged antivirus, but it will save you from some types of attacks. True, a firewall can become a problem when connecting a laptop or computer to the network. Therefore, the ideal option would be to install a third-party antivirus and disable Windows 7 protection after that.


The last stage of reinstalling Windows 7. If your computer or laptop is at home, then select your home network. For most users, this is the network configuration option needed in Windows 7.

After selecting the network type, Windows 7 will finally boot.

We hope our instructions on how to properly reinstall Windows 7 on a laptop or computer helped. The next step in reinstalling Windows 7 will be installing drivers. You can start.
The need to reinstall Windows 7 can be caused by various reasons: the consequences of a virus, crookedly installed drivers or programs, or simply a desire to return the laptop to the state it was at the time of sale. Currently, almost all commercially available devices allow you to reinstall Windows 7 in two ways: use the system's built-in recovery tools supplied by each manufacturer, or install Windows 7 on top of your existing operating system, overwriting all the data stored there.
The first method allows you to return the laptop to pre-sale condition, preserving the system license, which is usually included in the price of the device, and also relieves the user of the need to reinstall the utilities included with the device. The second method allows you to write a “clean” system onto the device without programs provided by the manufacturer that are unnecessary for some users, but deprives it of the ability to use a paid licensed Windows 7.
Starting a recovery of licensed Windows 7 on a laptop
If you have never reinstalled the system since purchasing a laptop, you can use the built-in tool to return the device to its factory state, which is the same as reinstalling the operating system. This is possible due to the fact that the manufacturer creates a recovery image in a hidden partition of the hard drive, which takes up only a few gigabytes.
To start Windows 7 recovery, press the special key several times when the system starts to boot, when the manufacturer's logo appears on the screen. You can usually find out which button or combination of buttons to press from the information at the bottom of the screen, where it should say something like Press F2 for Recovery.
The main laptop manufacturers have the following system recovery keys: MSI – F3, Samsung – F4 (you can also use the built-in Samsung Recovery Solution III utility), Fujitsu Siemens and Toshiba – A8, ASUS – F9, Sony VAIO and Packard Bell – F10, HP Pavilion, LG and Lenovo ThinkPad - F11, Acer - Alt+F10. You can get more specific information about each device on the manufacturer’s website.
Restoring a laptop to factory condition
Reinstalling the operating system using a boot image created by the manufacturer is quite simple. Let's consider this operation using an Acer laptop as an example.
When the manufacturer's logo appears, press the Alt + F10 keys simultaneously. Press it several times to make sure it works.

A window of the standard Acer eRecovery Management utility, designed to restore the system, will appear on the display. If the program asks for a password, and you are sure that you have not changed anything from the standard settings, try the factory passwords 000000, 00000000 or AIM1R8.
You need the “Full recovery...” item. Please note that when using this utility, all information on the system drive C: will be deleted, so copy the necessary files to another medium in advance.

A warning will appear in the next window that must be read to avoid any surprises.


The file recovery process takes approximately 15-20 minutes. This is much less than a complete reinstallation of the system would require.


After the operation is completed, all that remains is to click OK to reboot the device.

Windows 7 Initial Setup Utility
After the computer reboots, the system recovery utility will be launched, in the first window of which you should select the keyboard layout language and click Next.

After this, you should enter your username and computer name, and in the next window agree to the license agreement.


You should choose the automatic update method based on your preferences. Most often, it is best to use the recommended settings.

Enter the time, date and time zone.

After this, a desktop will appear in front of you, at the bottom of which the progress of installing drivers and utilities will be shown. This usually takes about 20 minutes. Typically, the device comes standard with an antivirus, which from time to time will make a request to enter information into the registry. Click OK.

After the process of installing drivers and programs is completed, the utility will delete temporary files and reboot the system.

Usually, after this, a pre-installed antivirus (most often McAfee or Symantec) request for activation appears. The optimal solution would be to remove this software and install a better antivirus instead (for example, Eset Nod32 Smart Security or Kaspersky Internet Security).
Please note that in some cases the system image on the hidden partition may be damaged, which will make it impossible to reinstall Windows 7 on the laptop while maintaining the license. To avoid this, you should create a recovery disk in advance using the Acer eRecovery Management utility. To do this you will need two DVD-R discs.
Restoring factory settings on laptops from another manufacturer is no different from the procedure described above.
Reinstalling Windows 7 on a laptop
Some users prefer to stop using the licensed Windows 7 included with the laptop, replacing it with another system. This may be due to several reasons. Firstly, not all users like the factory configuration of the device, which includes programs and utilities that take up space on the hard drive; secondly, some prefer to replace Windows 7 with another version of the system, for example, change the 32-bit version to a 64-bit one or Starter on Home Basic or Professional. In addition, some users even prefer to use all kinds of “assemblies” that include many programs.
In this case, reinstalling Windows 7 on a laptop will be no different from a standard installation of the operating system. Initially, you need to prepare a boot disk with Windows 7 recorded on it or, if the device is not equipped with a DVD-ROM, a bootable USB flash drive.
The first step is to download Windows 7 from the Internet. If you want to use the system according to your license, you should download exactly the version for which the key is indicated on the laptop. Usually the inscription looks something like this: Windows 7 basic OEM 32-bit(x86). Accordingly, you should download a similar version of Windows 7, since the key indicated on the bottom of the laptop is only suitable for it. If you are going to use a pirated copy of the system, you can choose any OS version you are interested in.
Creating a boot disk
After you have downloaded the system image, you should burn it to DVD, for which you can use the free ImgBurn program. Insert a blank disc into the DVD-ROM and run ImgBurn. In the window that appears, click the Browse button and specify the path to the Windows 7 image.

In the program settings, specify the minimum speed.


Once the DVD burning process is completed, a small window will appear. Click OK, after which the disc with Windows 7 recorded on it will be automatically ejected from the DVD-ROM.

Preparing to install Windows 7
Now you need to set the BIOS to boot the device from disk, otherwise the computer will continue to run Windows installed on the HDD. To open settings
BIOS, repeatedly press the key indicated at the bottom of the screen while the system boots.
In the BIOS settings, you should find the First Boot Device item, where you can change the settings so that the DVD-ROM comes first. Please note that while the BIOS is running, the mouse buttons will not work, so you will have to perform all the necessary actions using the arrow buttons on the keyboard.

To save the settings and exit the BIOS, press the F10 key.
Reinstalling Windows 7
After that, all that remains is to insert the Windows 7 disc into the DVD-ROM and restart the computer. After a while, a black screen will appear in front of you with the words Press any key to boot from Cd. Press any key. The installation of Windows 7 will begin.


In the next window, click on the Install button.

Ten minutes later, a window with a license will appear in front of us. Check the box to accept its terms and click Next.

In the next window, select Full installation.

After this, you will see a list of partitions, including the system disk. Select it and click on the Format button. The system will delete all information available there from the partition.

Once the drive is formatted, click Next. The process of unpacking the files will begin, which usually takes about 20 minutes.

You need to wait for a window with fields to enter your name and computer name (can be anything).

Password fields can be left blank.

Enter the product code, which can be found on the bottom of your laptop or on a sticker on your laptop.

In the next window, select Use recommended settings.

Set your time zone.

In a few minutes, the Windows 7 desktop will appear in front of you.

Now you know how to reinstall Windows on a laptop by simply returning the laptop to factory settings or installing a new clean system on it.